Cypress Studio
Removed
Cypress Studio has been removed in Cypress v10 and will be rethought/revisited in a later release. This page is for reference only.
What you'll learn
- How to extend tests interactively using the Cypress Studio
- How to add new tests interactively using the Cypress Studio
Overview
Cypress Studio provides a visual way to generate tests within Cypress, by recording interactions against the application under test.
The .click(), .type(),
.check(), .uncheck(), and
.select() Cypress commands are supported and will
generate test code when interacting with the DOM inside of the Cypress Studio.
You can also generate assertions by right clicking on an element that you would
like to assert on.
Using Cypress Studio
Cypress Studio is an experimental feature and can be enabled by adding the experimentalStudio attribute to your Cypress configuration.
const { defineConfig } = require('cypress')

module.exports = defineConfig({
  experimentalStudio: true
})
import { defineConfig } from 'cypress'

export default defineConfig({
  experimentalStudio: true
})
The cypress.json file has been replaced by cypress.config.js or cypress.config.ts in Cypress version 10.0.0. We recommend
that you update your configuration accordingly.
Please see the new configuration guide and the migration guide for more information.
{
  "experimentalStudio": true
}
The Cypress Real World App (RWA) is an open source project implementing a payment application to demonstrate real-world usage of Cypress testing methods, patterns, and workflows. It will be used to demonstrate the functionality of Cypress Studio below.
Extending a Test
You can extend any preexisting test or start by creating a new test with the following test scaffolding.
// Code from Real World App (RWA)
describe('Cypress Studio Demo', () => {
  beforeEach(() => {
    // Seed database with test data
    cy.task('db:seed')

    // Login test user
    cy.database('find', 'users').then((user) => {
      cy.login(user.username, 's3cret', true)
    })
  })

  it('create new transaction', () => {
    // Extend test with Cypress Studio
  })
})
Real World Example
Clone the Real World App (RWA) and refer to the cypress/tests/demo/cypress-studio.cy.ts file.
Step 1 - Run the spec
We will use Cypress Studio to perform a "New Transaction" user journey. First, launch Cypress and run the spec created in the previous step.
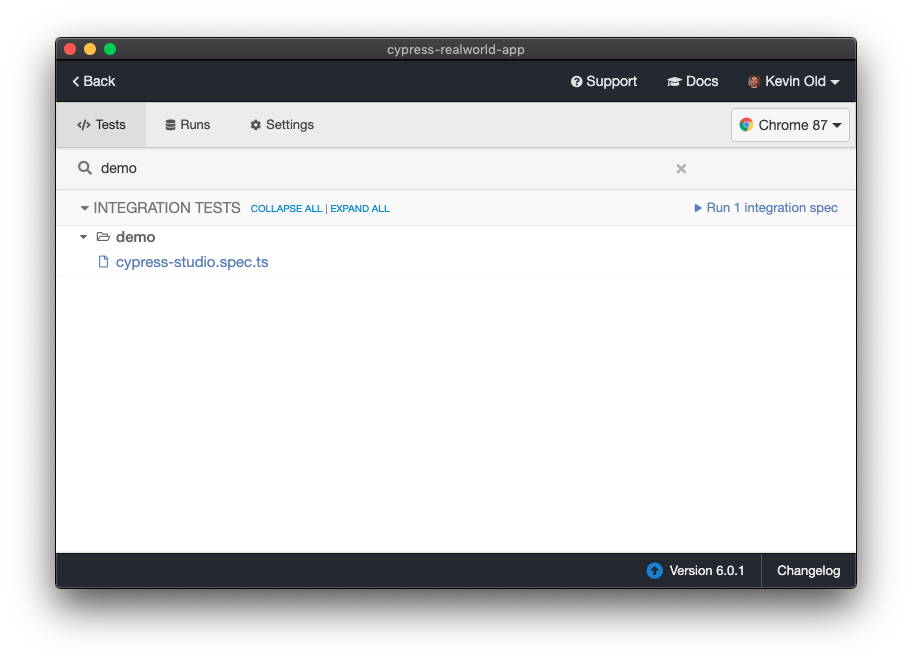
Step 2 - Launch Cypress Studio
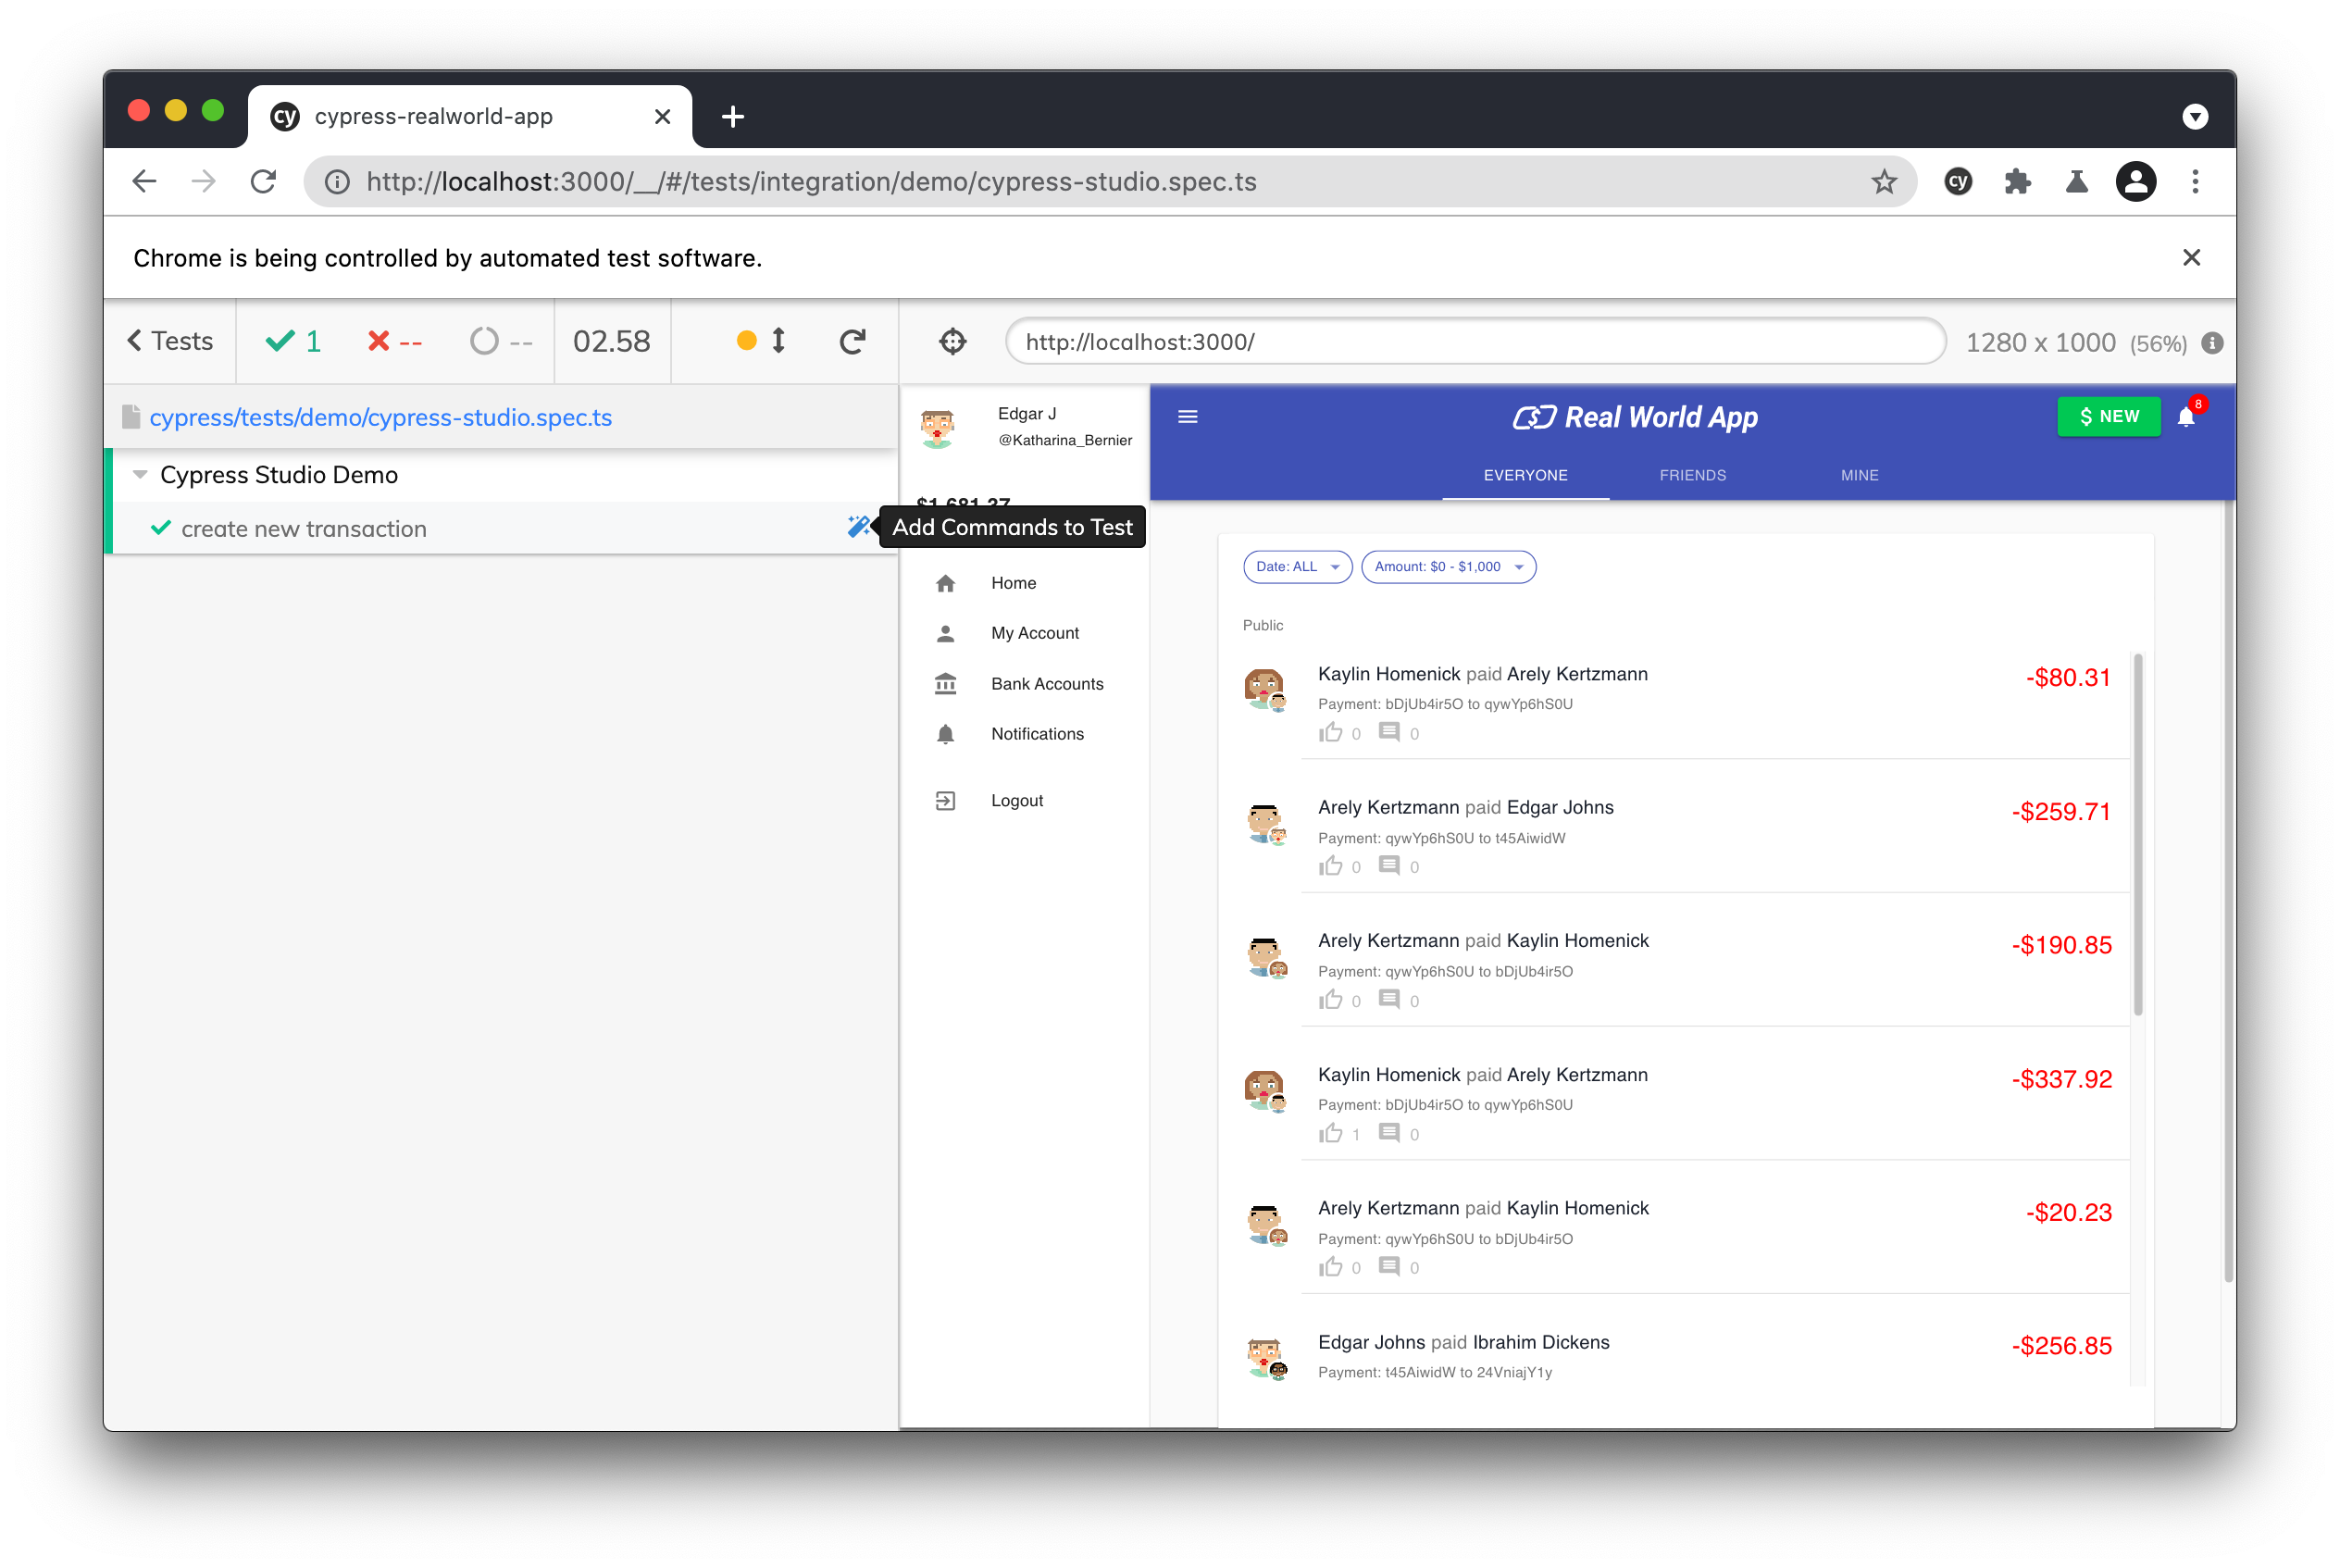
Once the tests complete their run, hover over a test in the Command Log to reveal an "Add Commands to Test" button.
Clicking on "Add Commands to Test" will launch the Cypress Studio.
Cypress Studio is directly integrated with the Command Log.
Cypress will automatically execute all hooks and currently present test code,
and then the test can be extended from that point on (e.g. We are logged into
the application inside the beforeEach block).
Next, Cypress will execute the test in isolation and pause after the last command in the test.
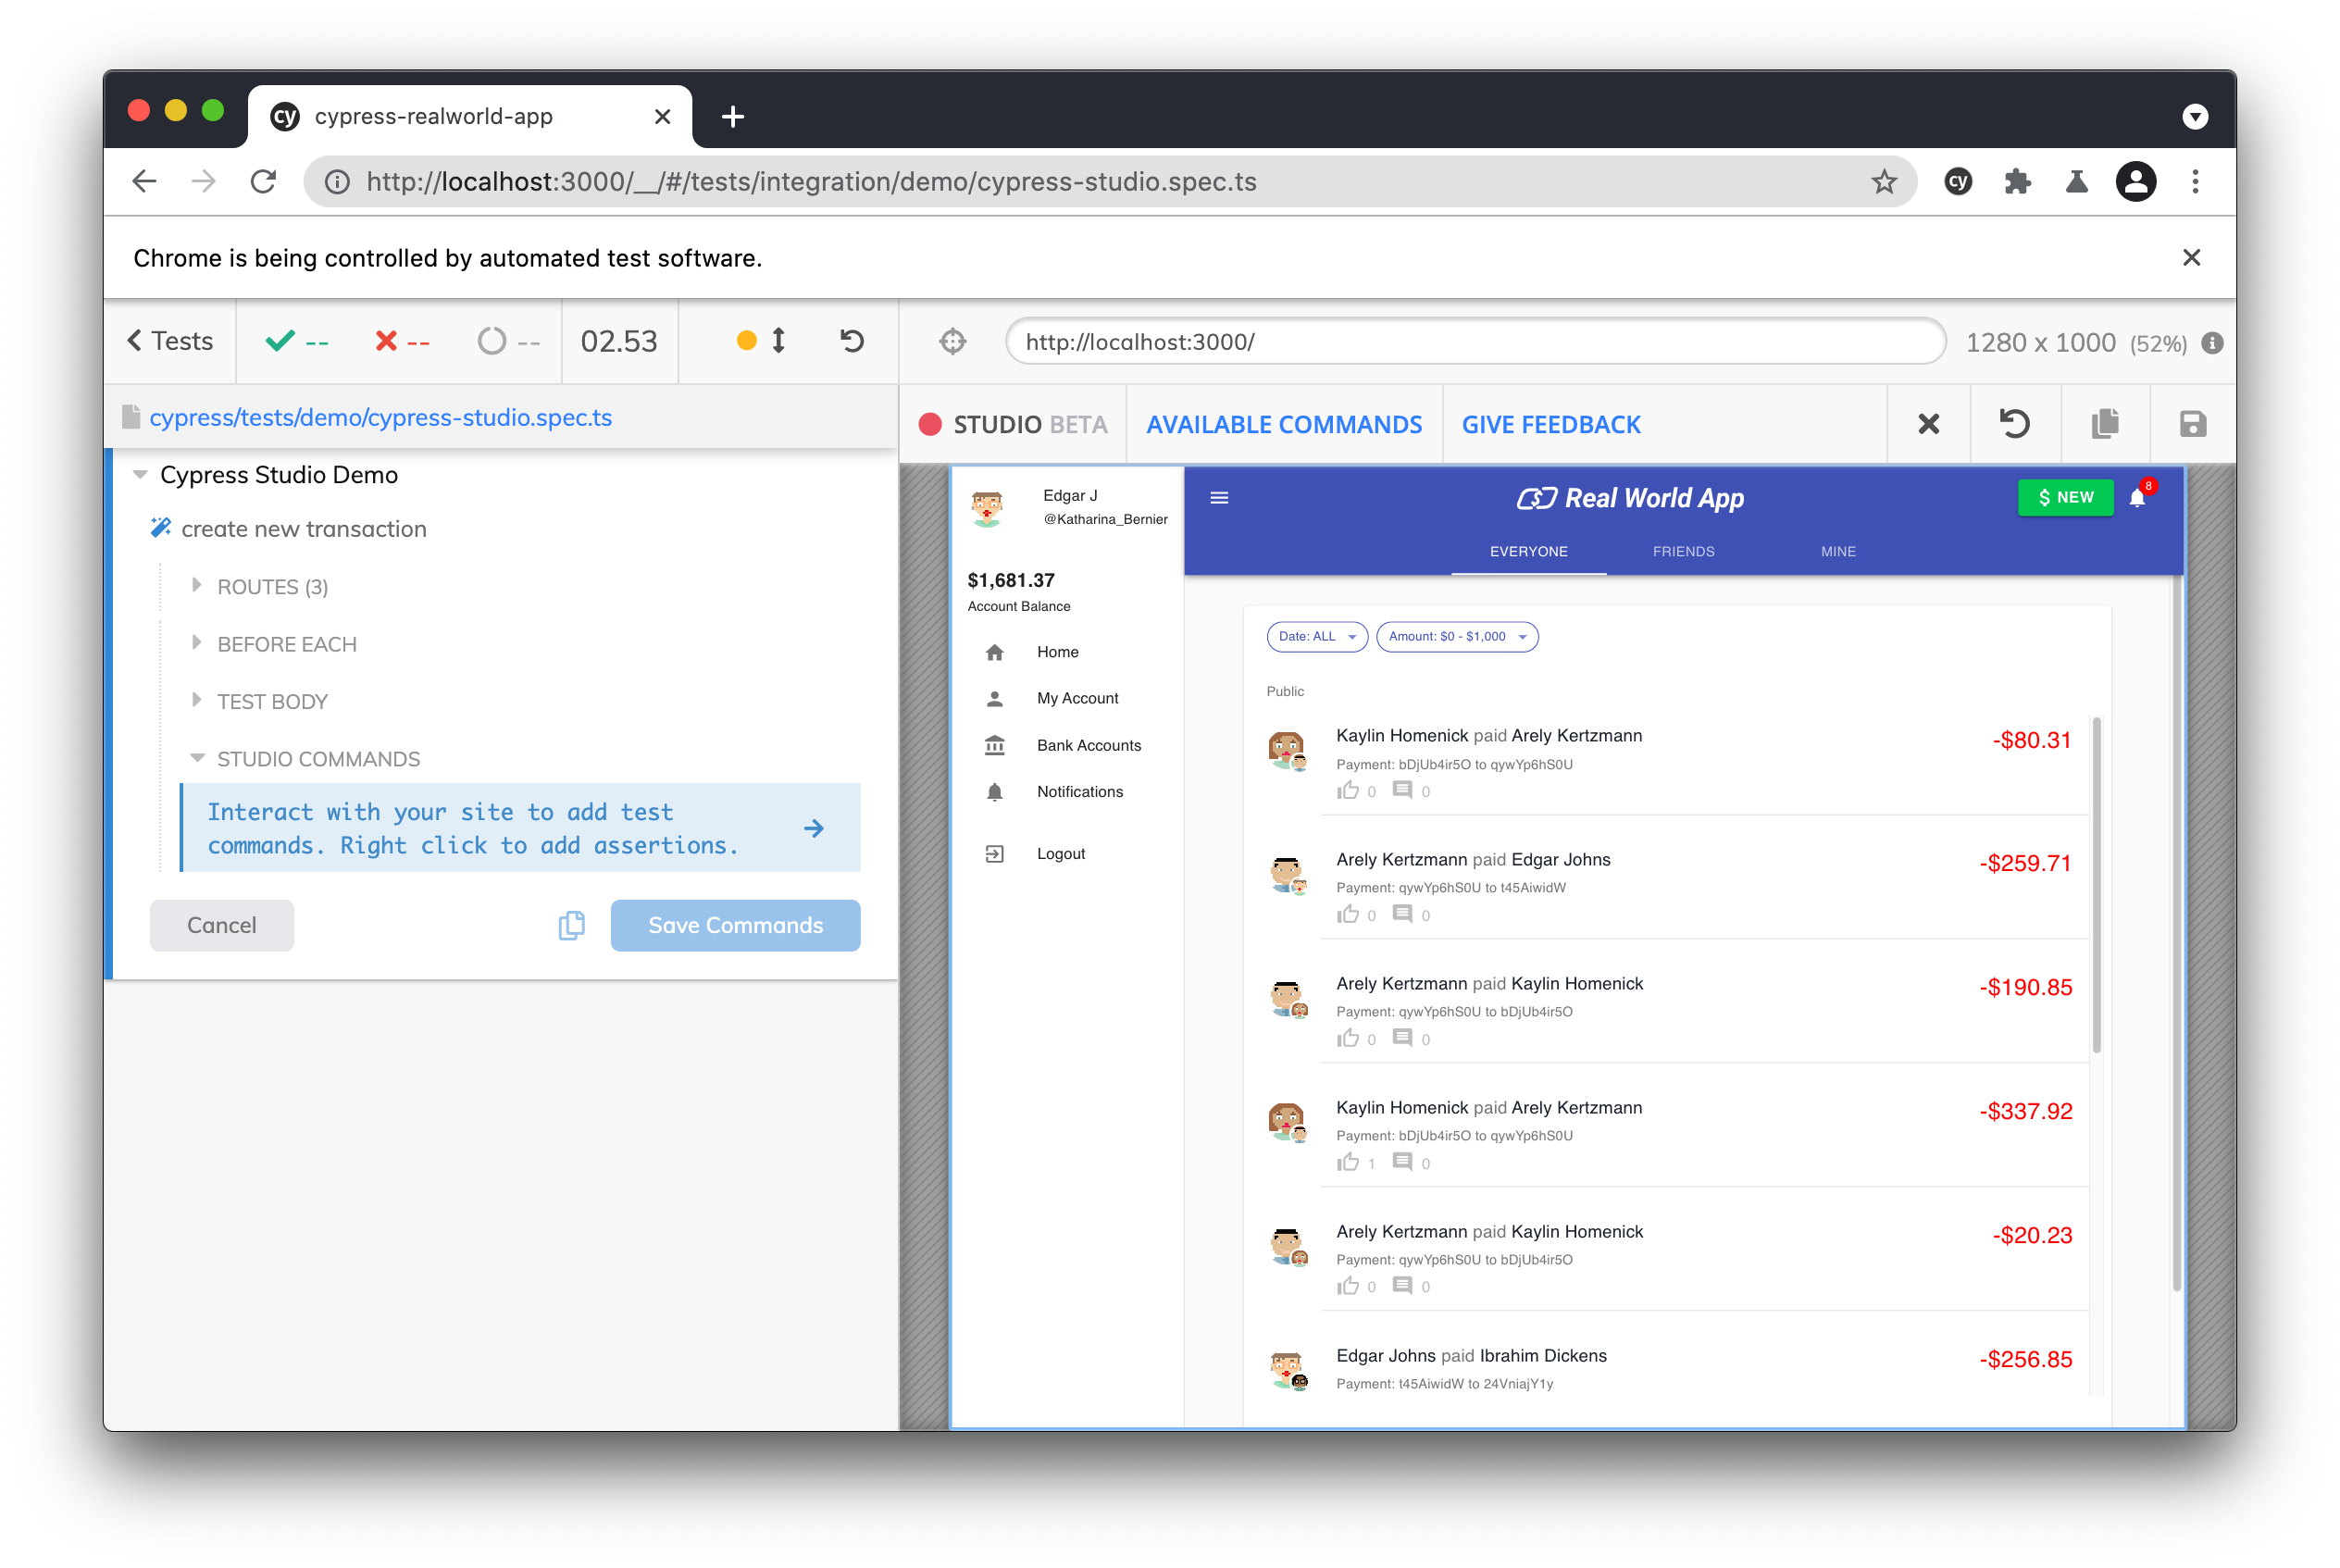
Now, we can begin updating the test to create a new transaction between users.
Step 3 - Interact with the Application
To record actions, begin interacting with the application. Here we will click on the "New" button on the right side of the header and as a result we will see our click recorded in the Command Log.
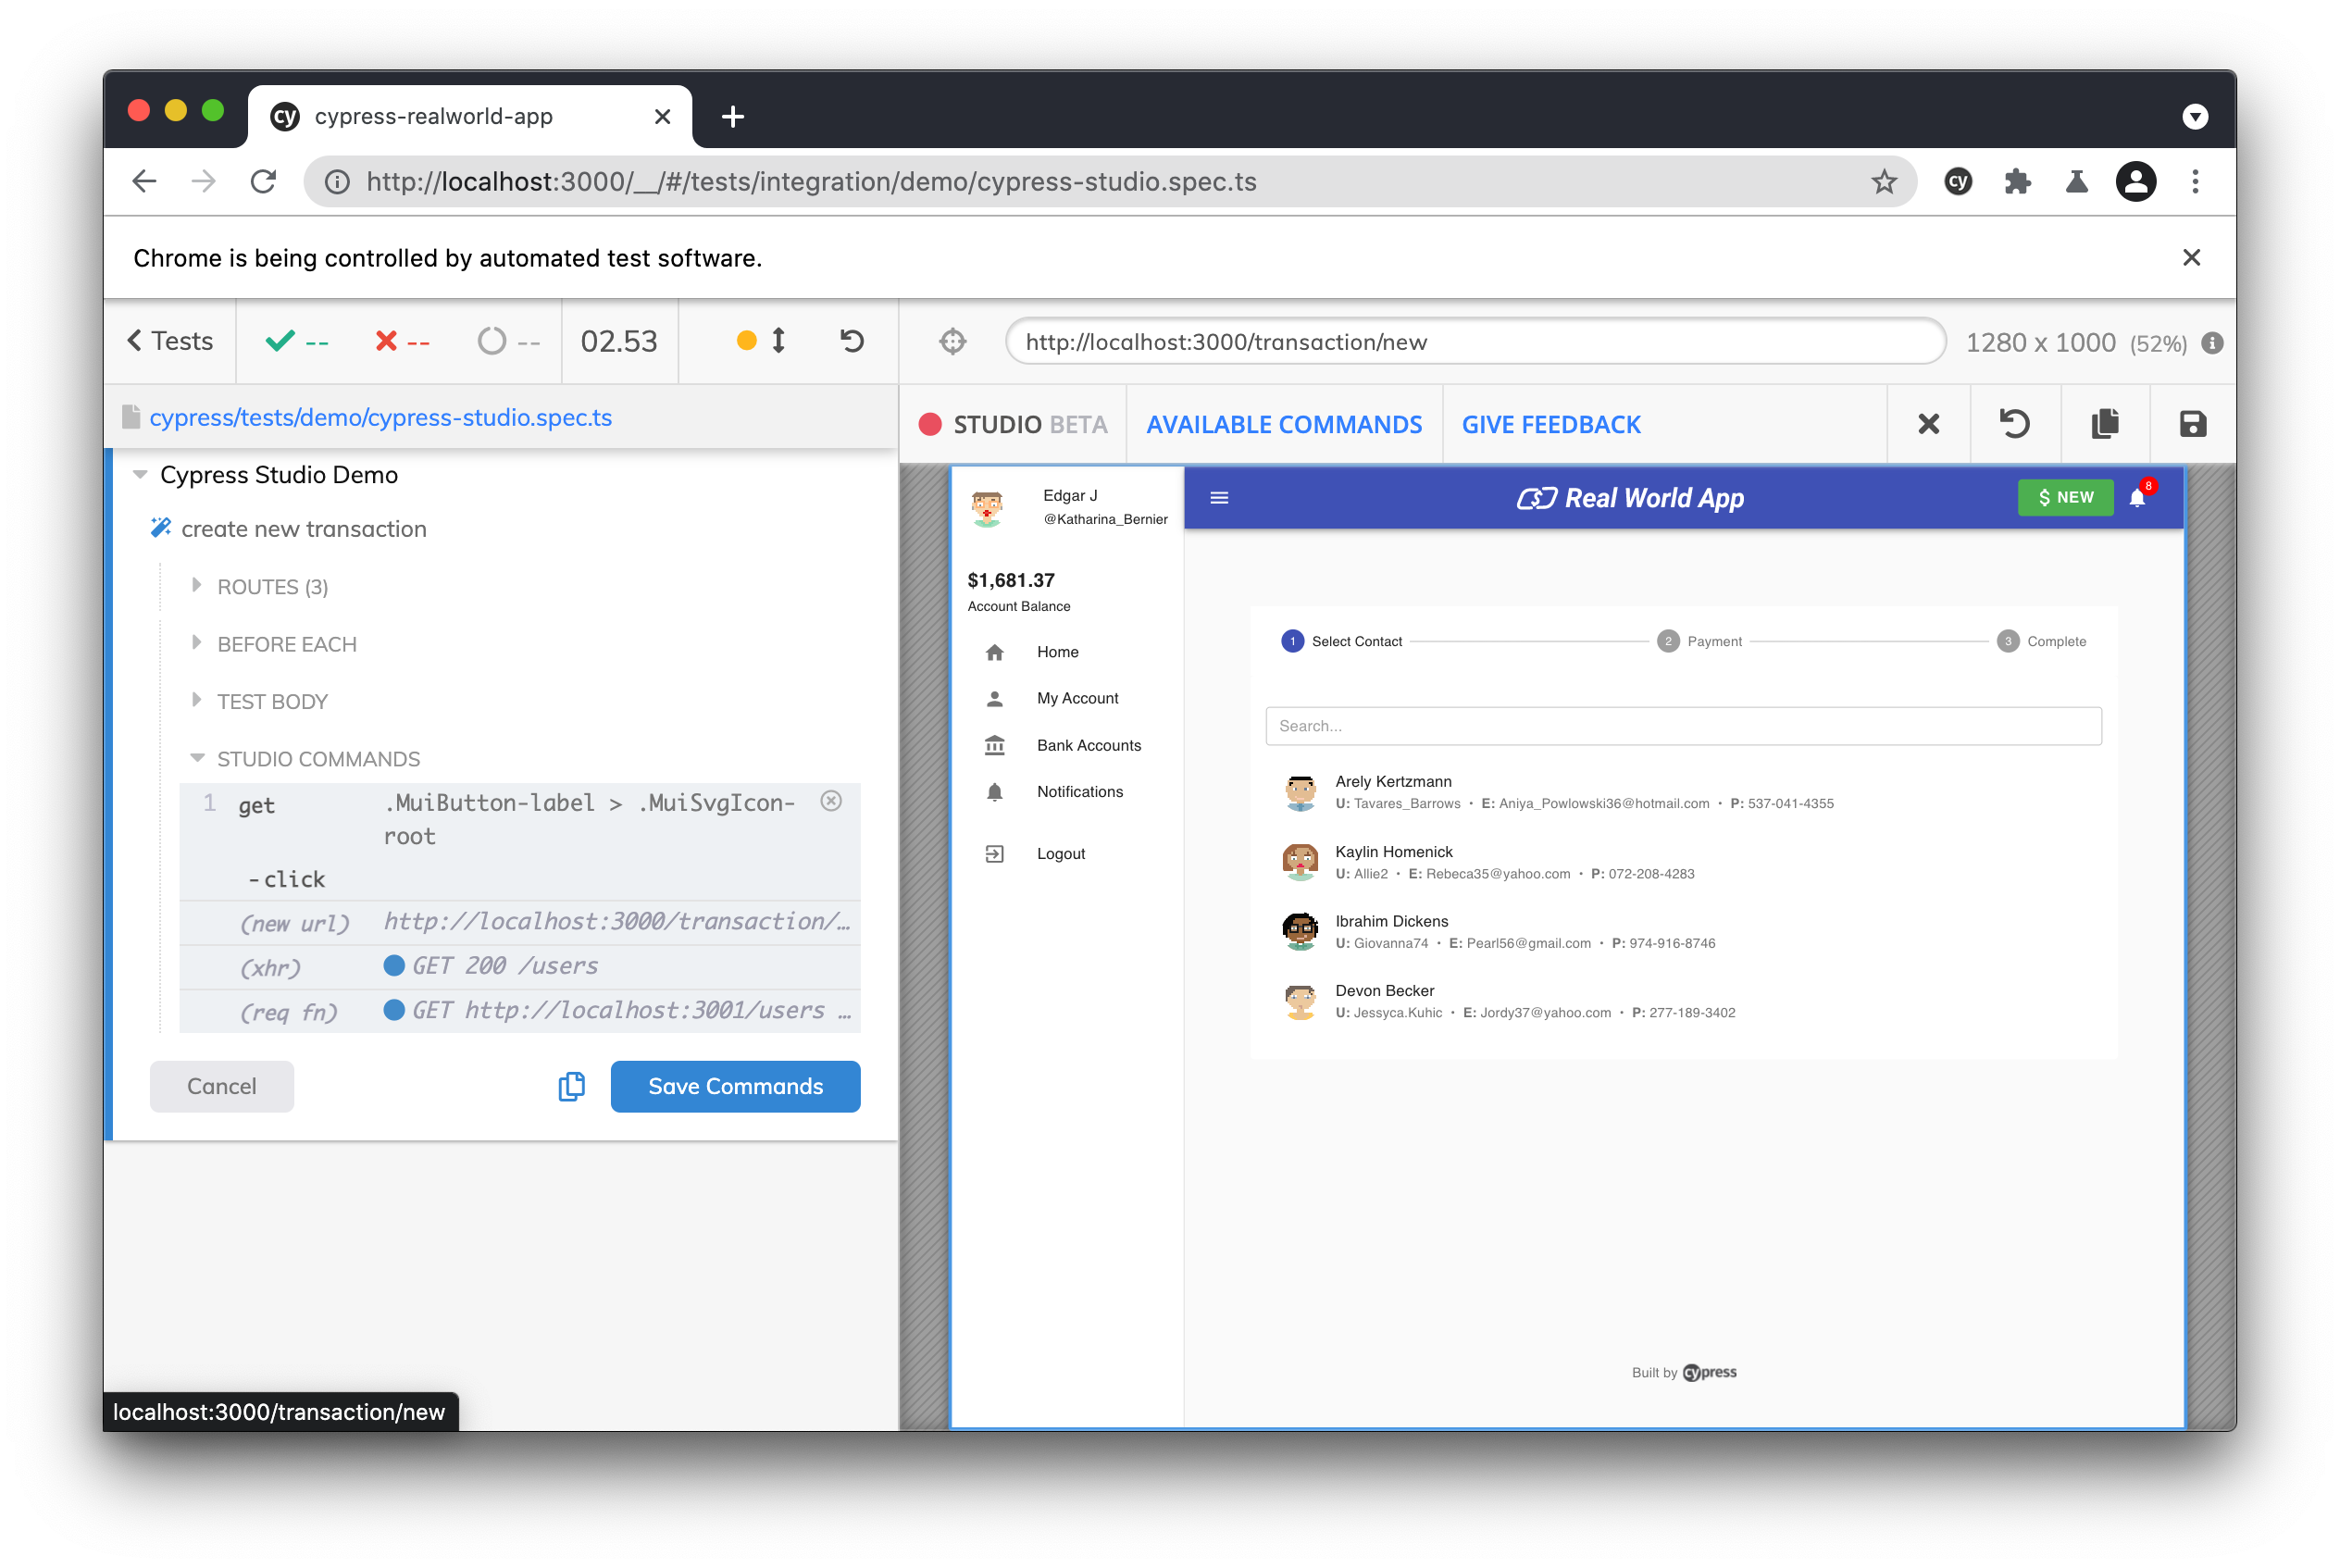
Next, we can start typing in the name of a user that we want to pay.
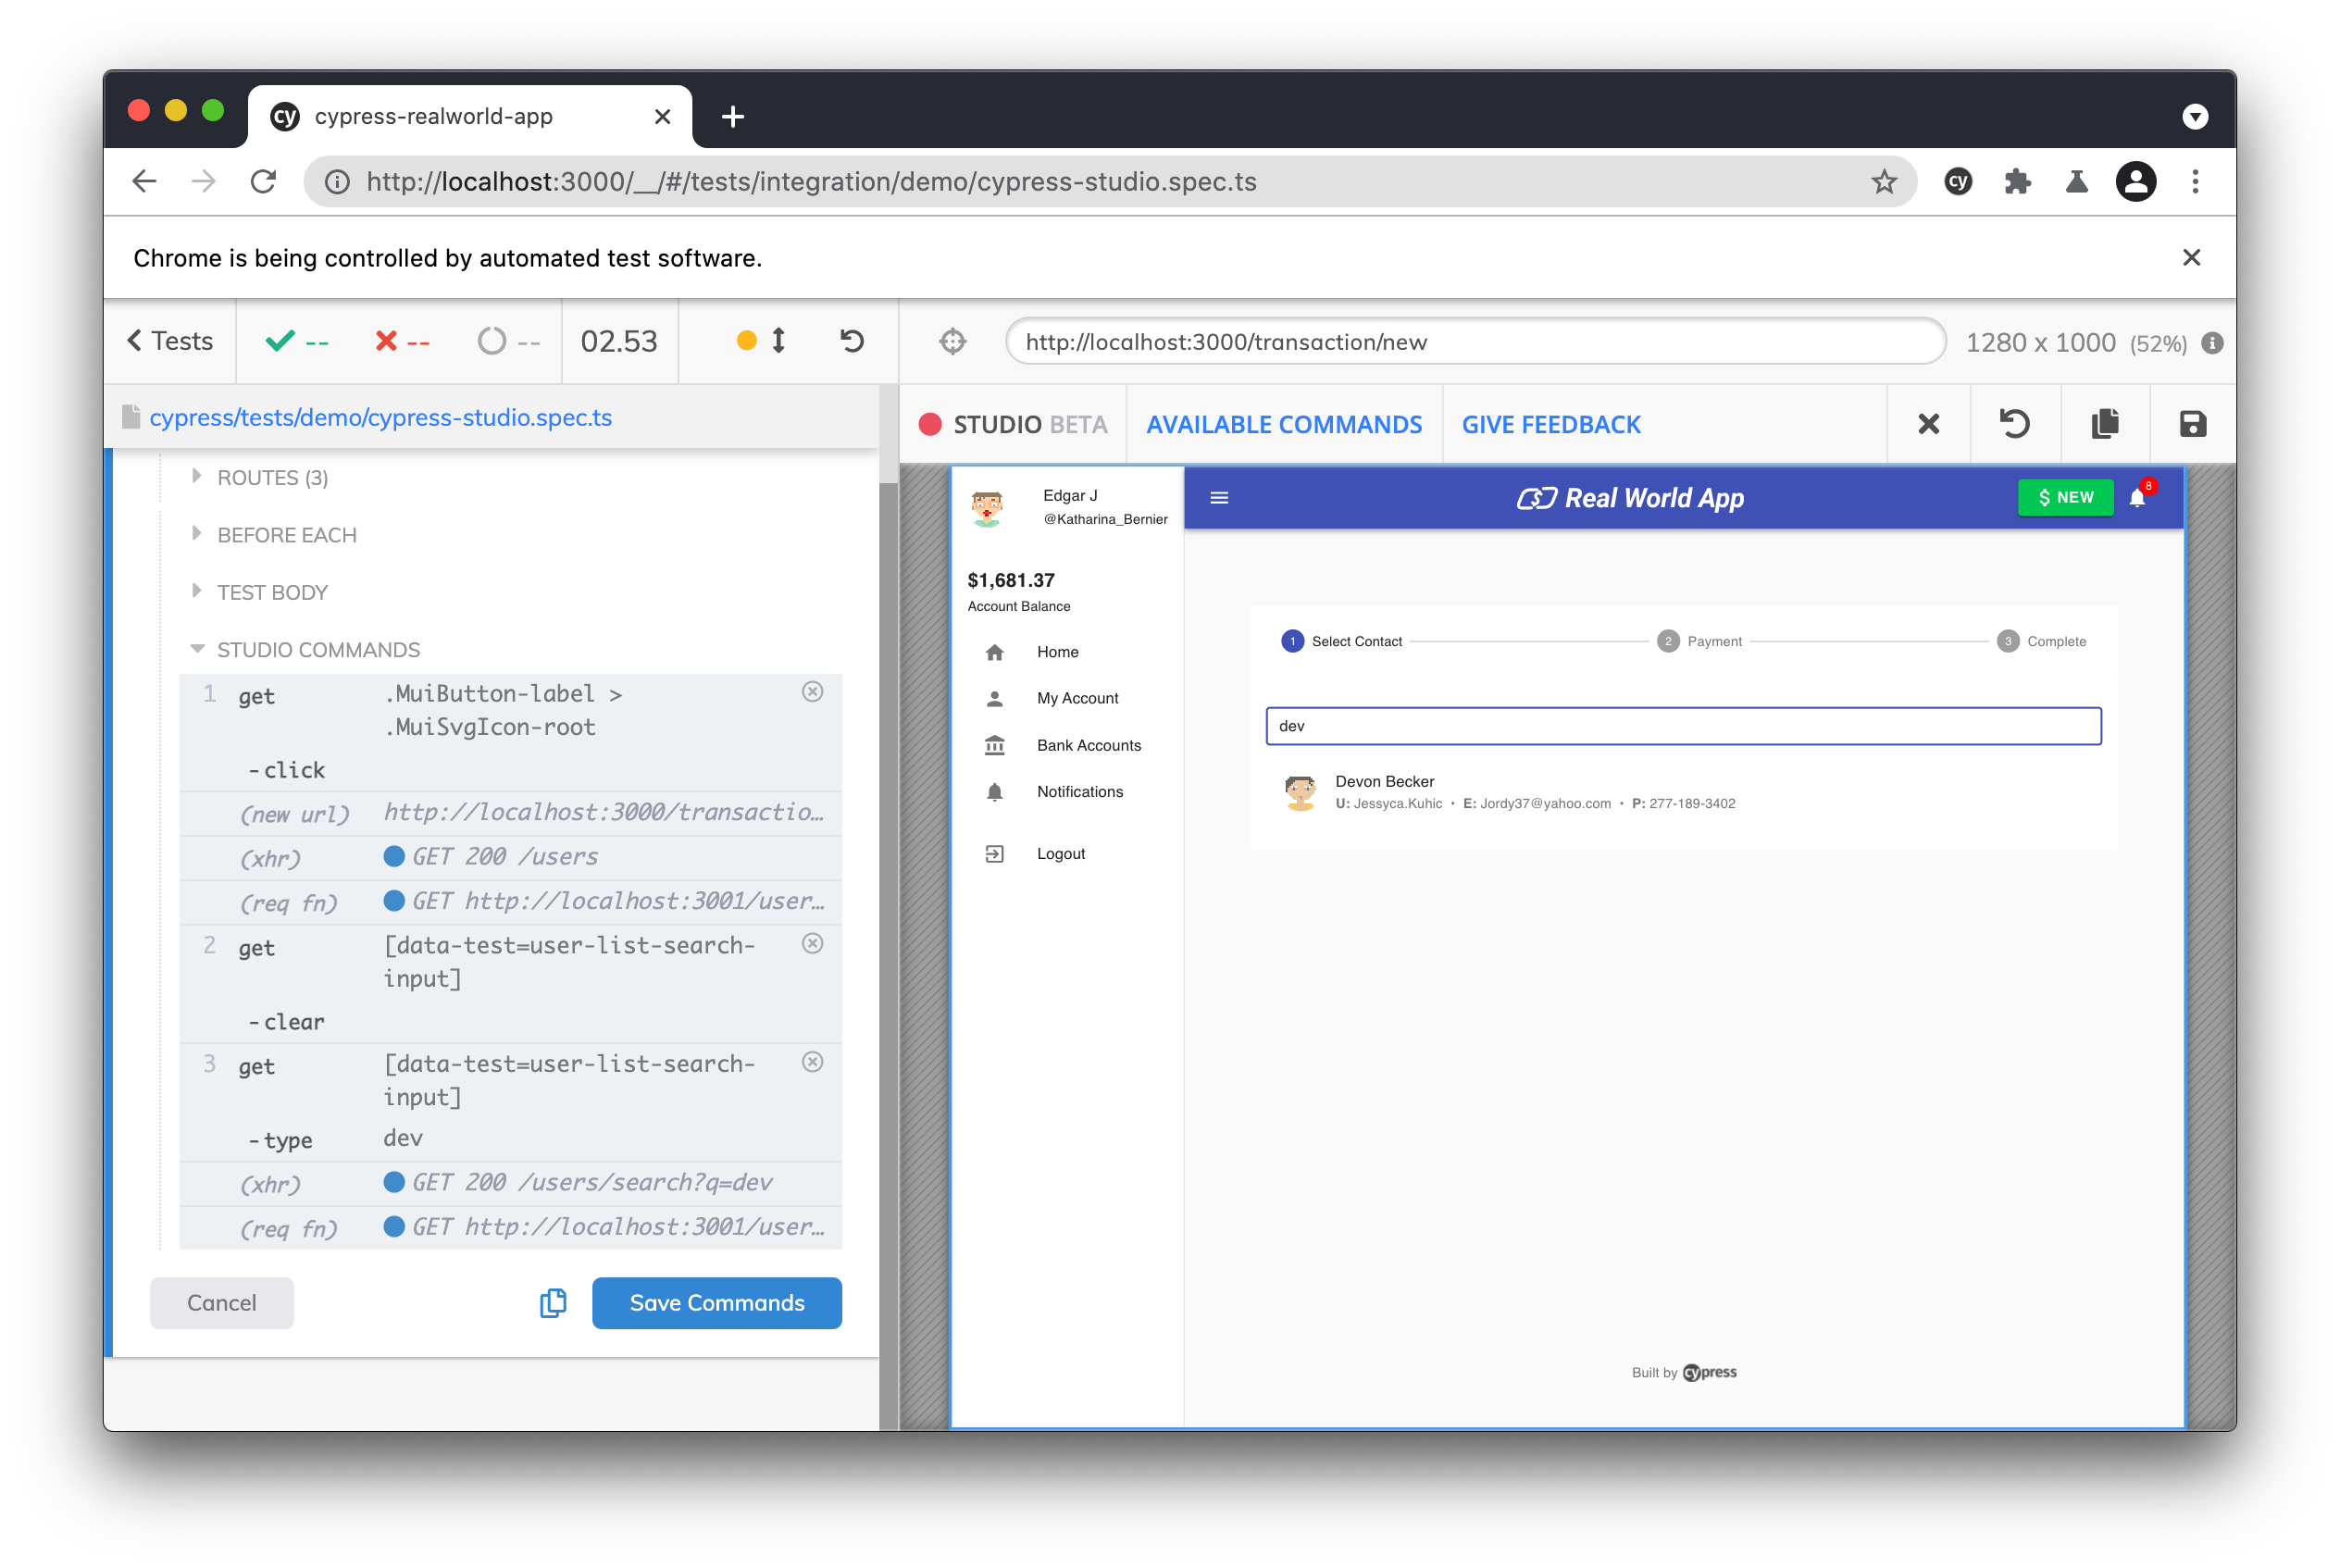
Once we see the name come up in the results, we want to add an assertion to ensure that our search function works correctly. Right clicking on the user's name will bring up a menu from which we can add an assertion to check that the element contains the correct text (the user's name).
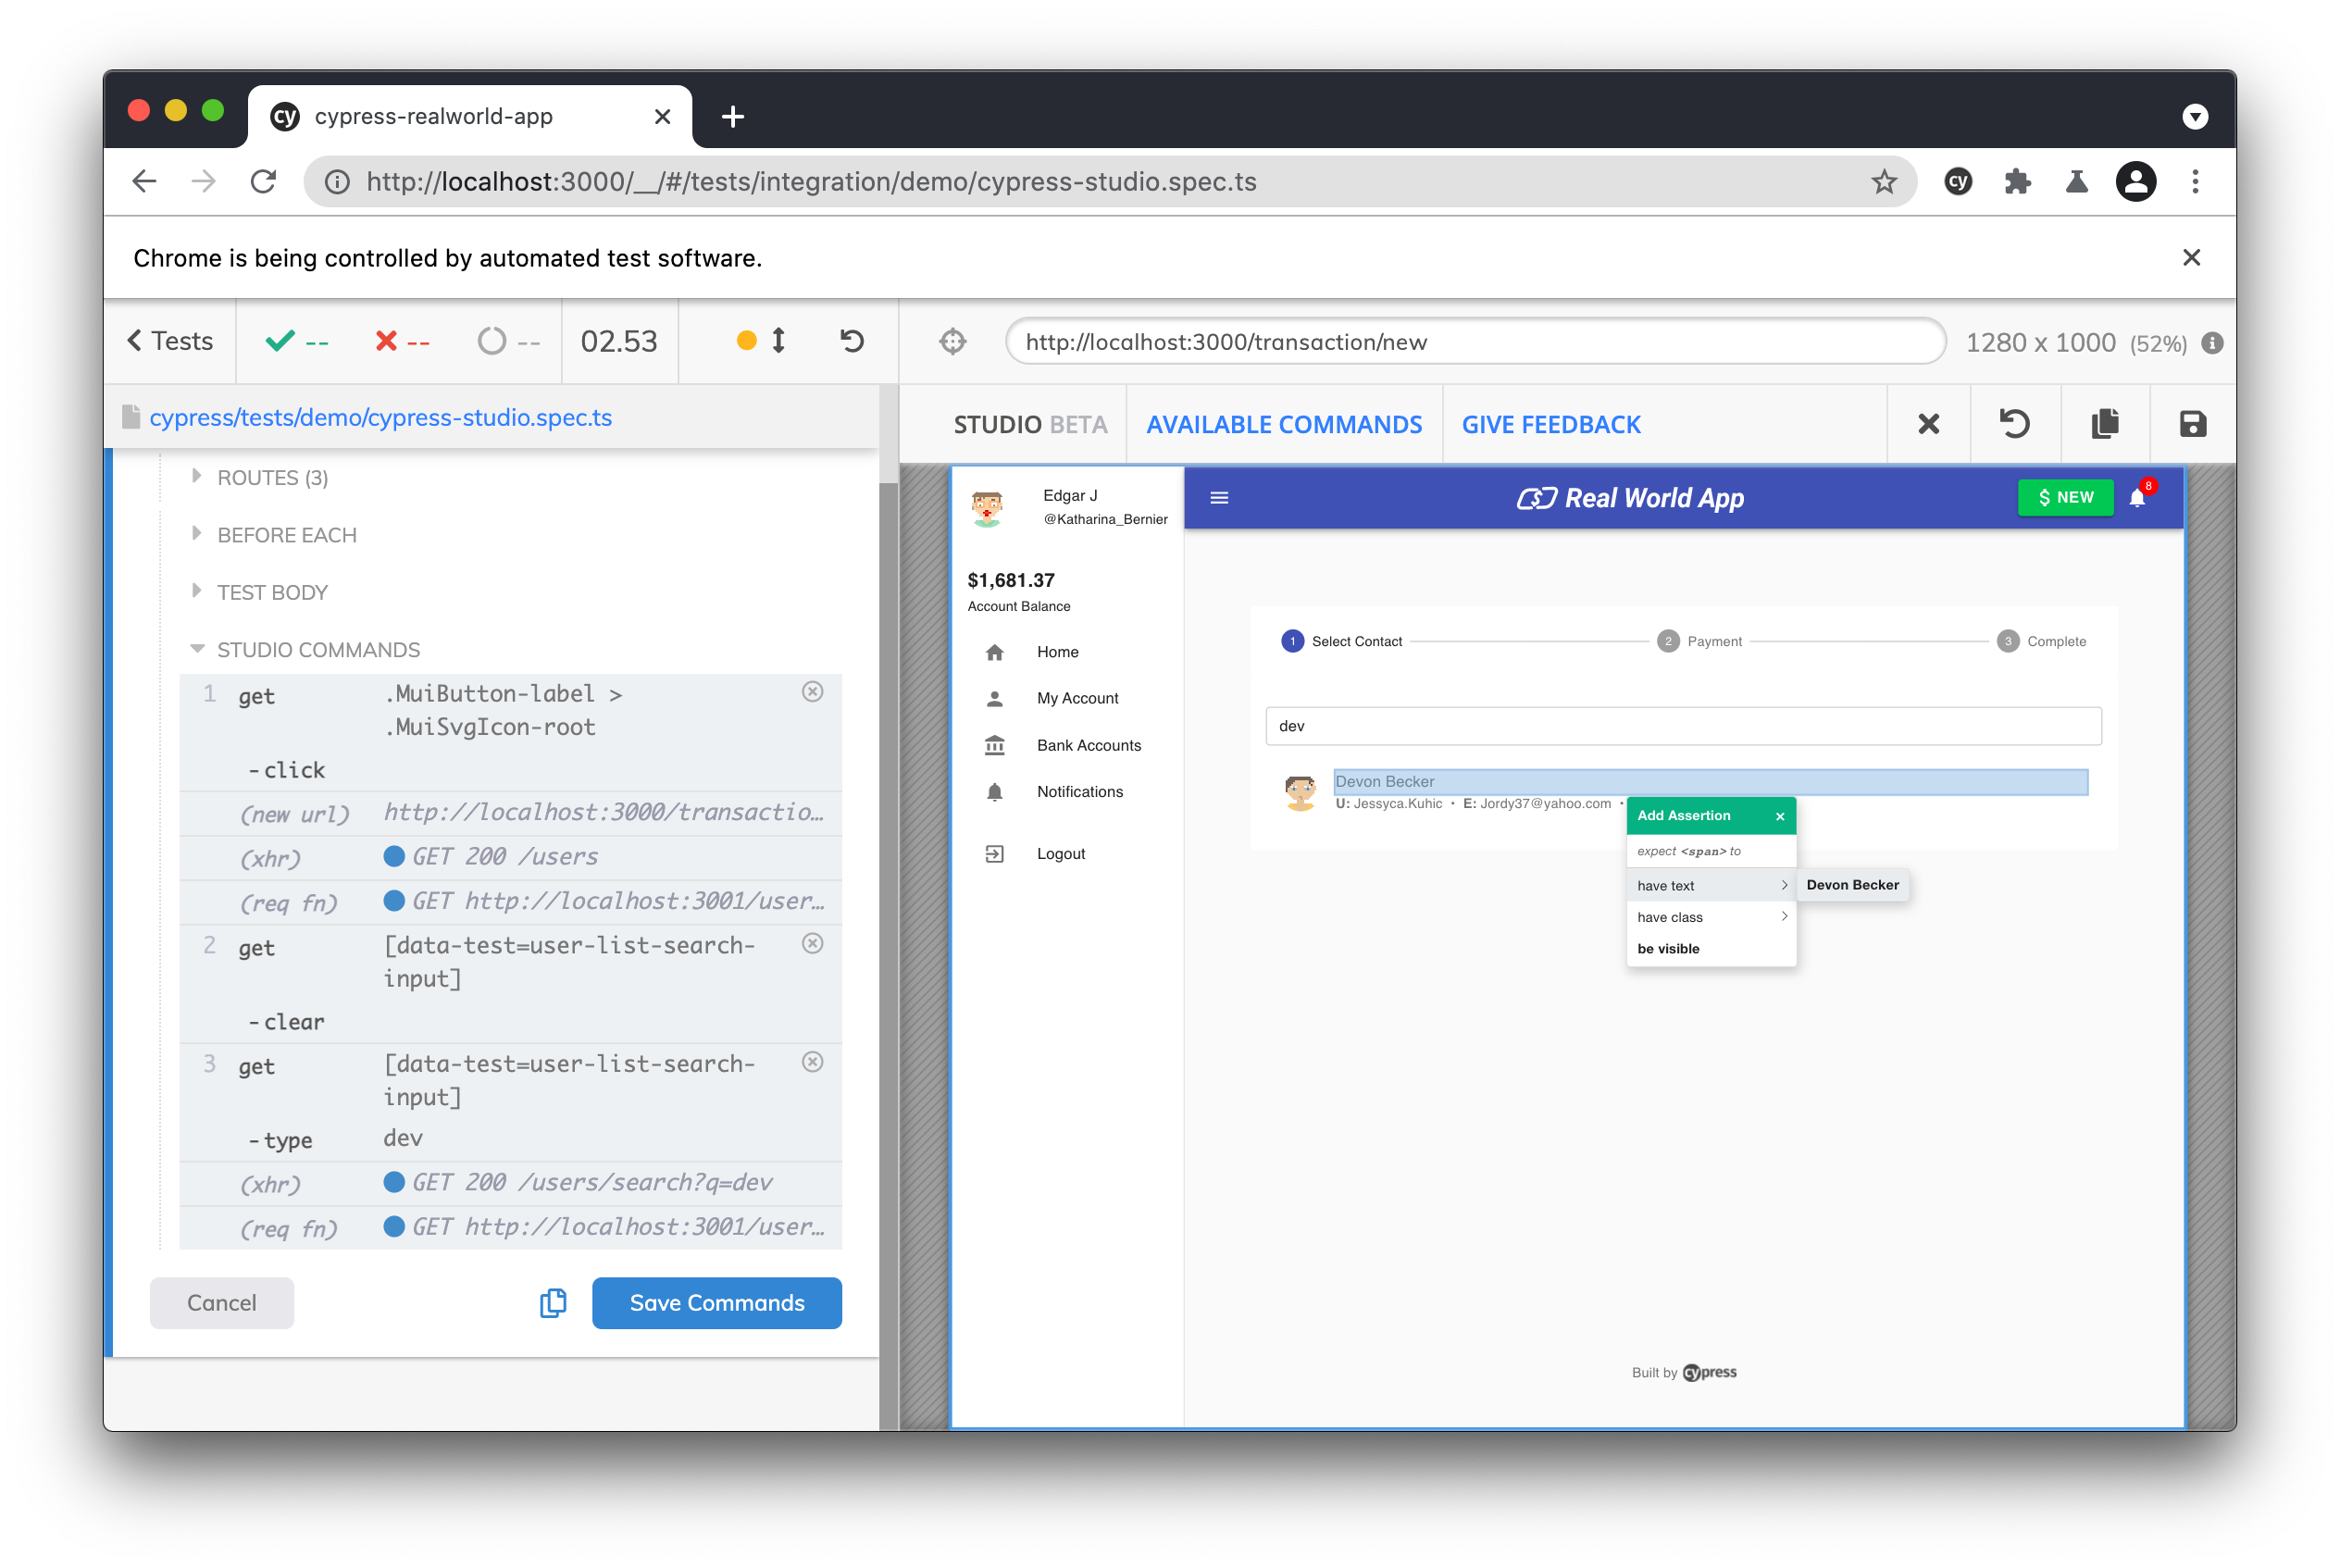
We can then click on that user in order to progress to the next screen. We will complete the transaction form by clicking on and typing in the amount and description inputs.
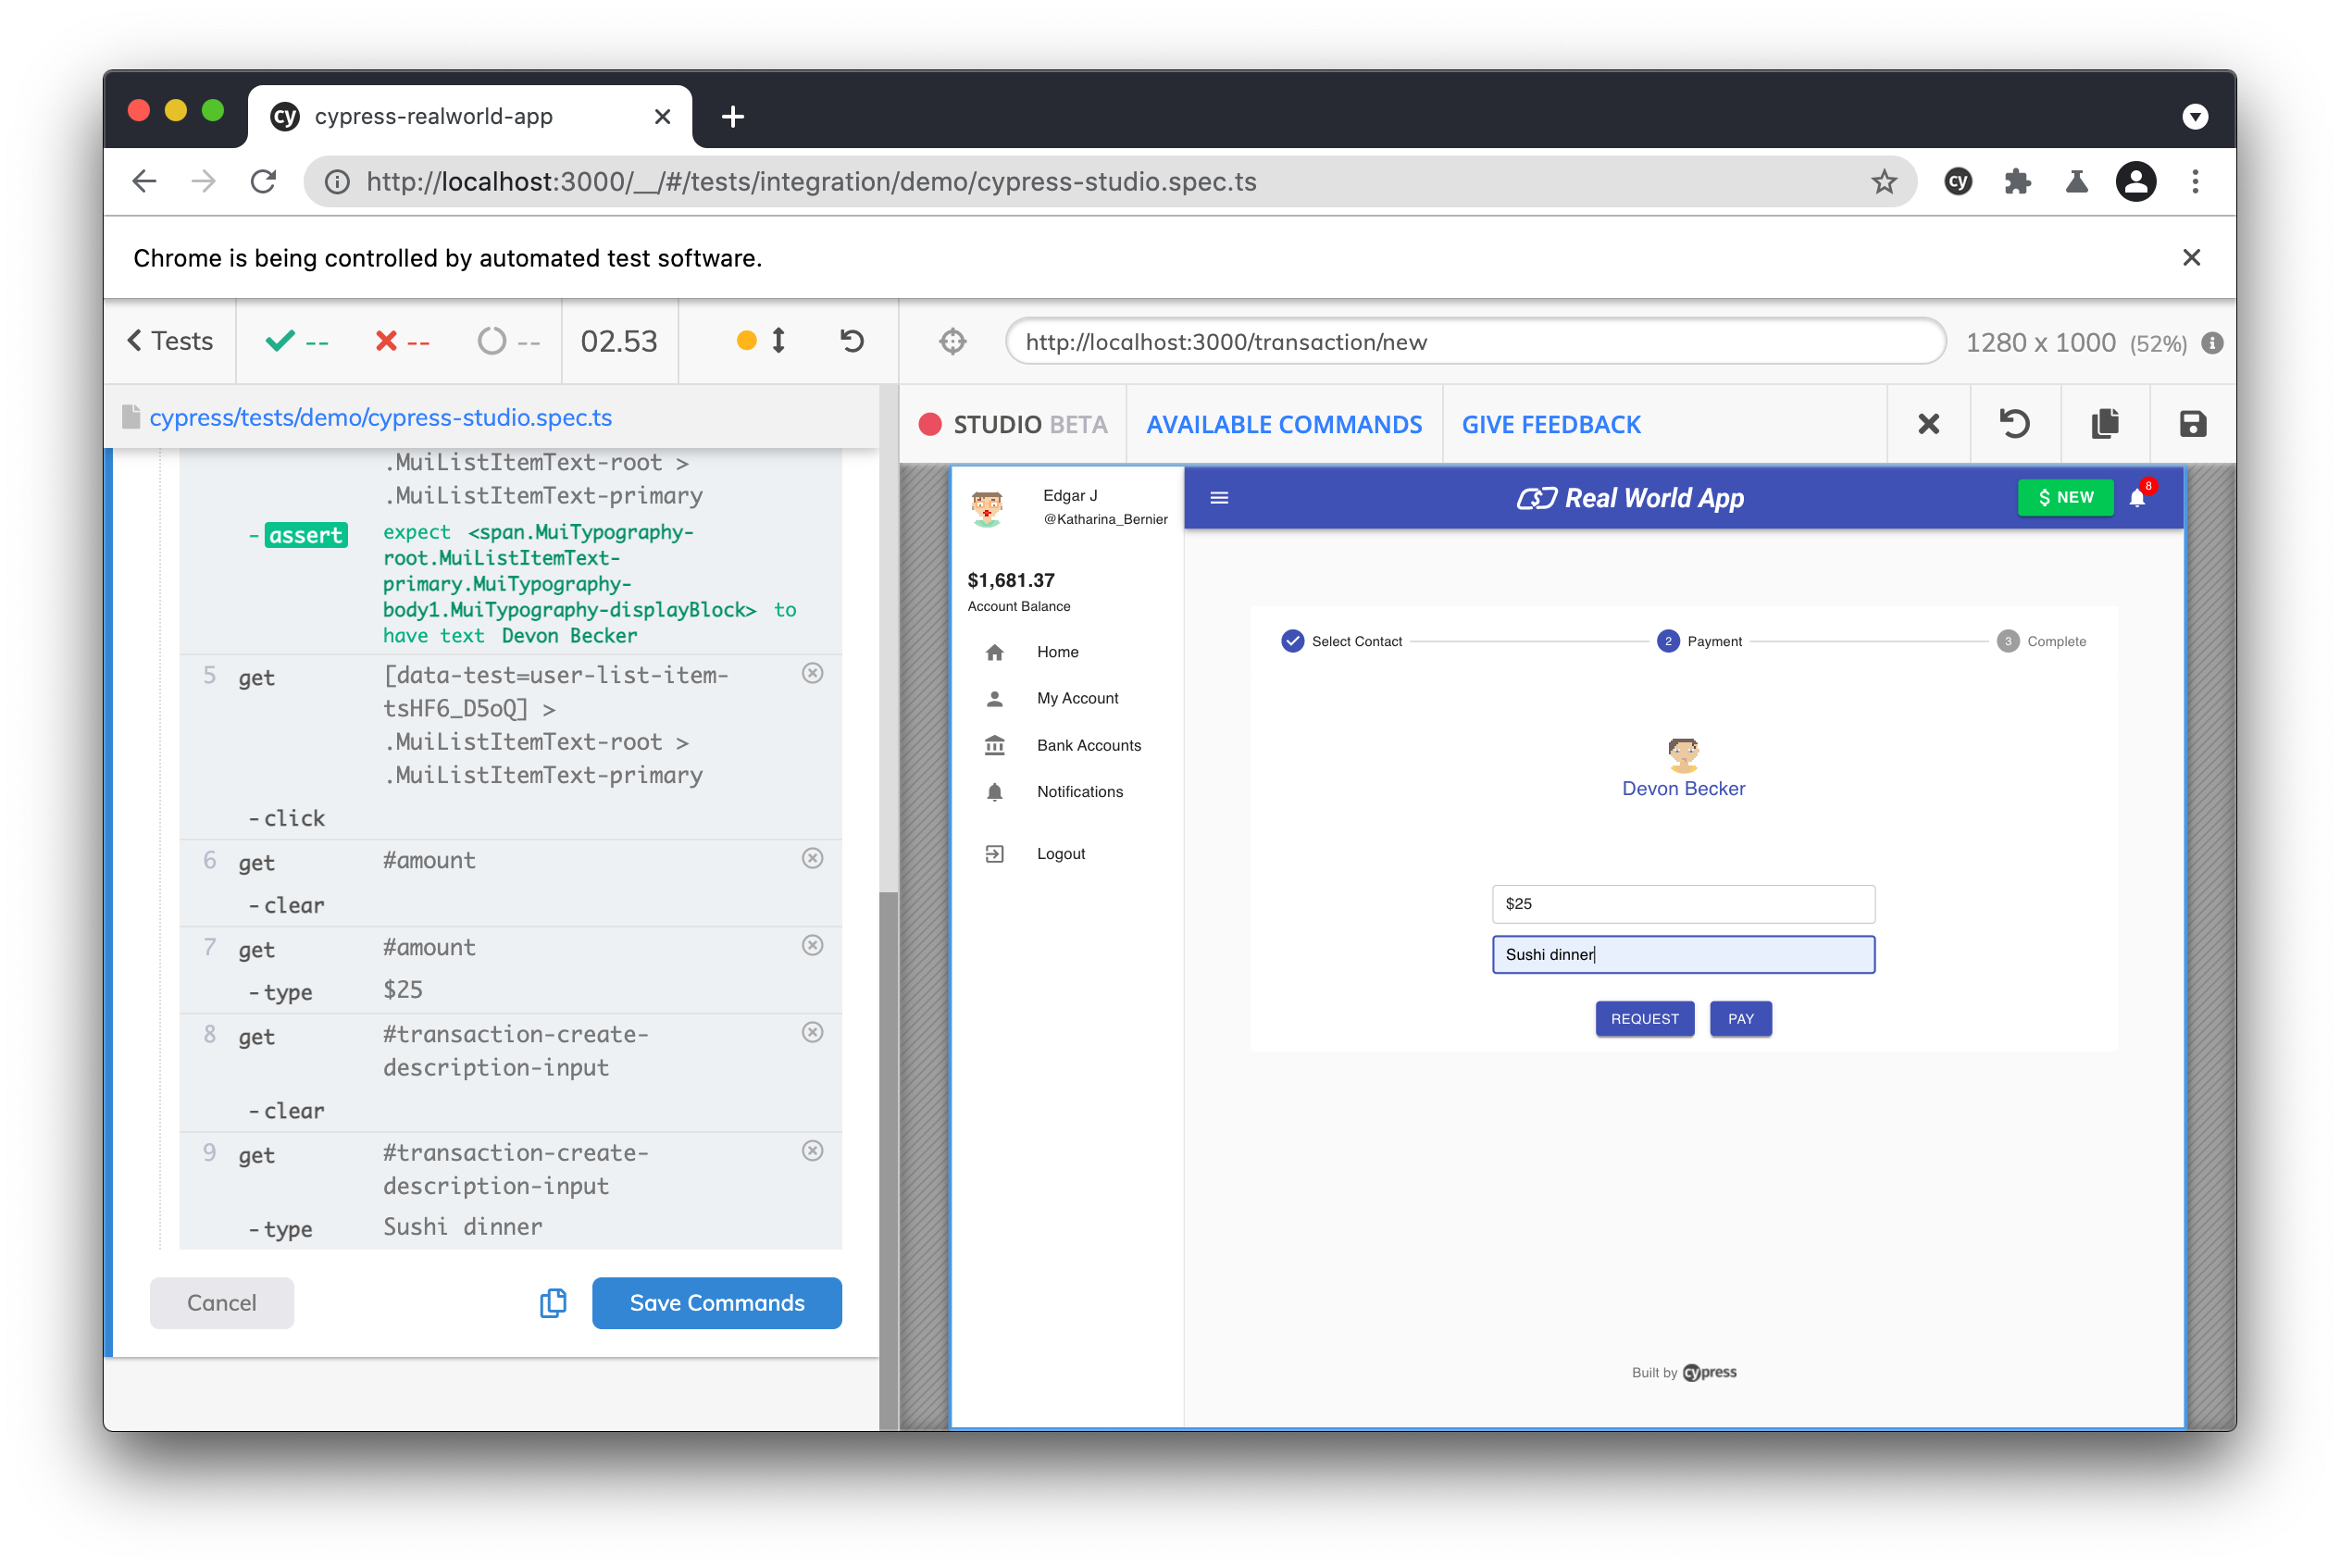
Now it's time to complete the transaction. You might have noticed that the "Pay" button was disabled before we typed into the inputs. To make sure that our form validation works properly, let's add an assertion to make sure the "Pay" button is enabled.
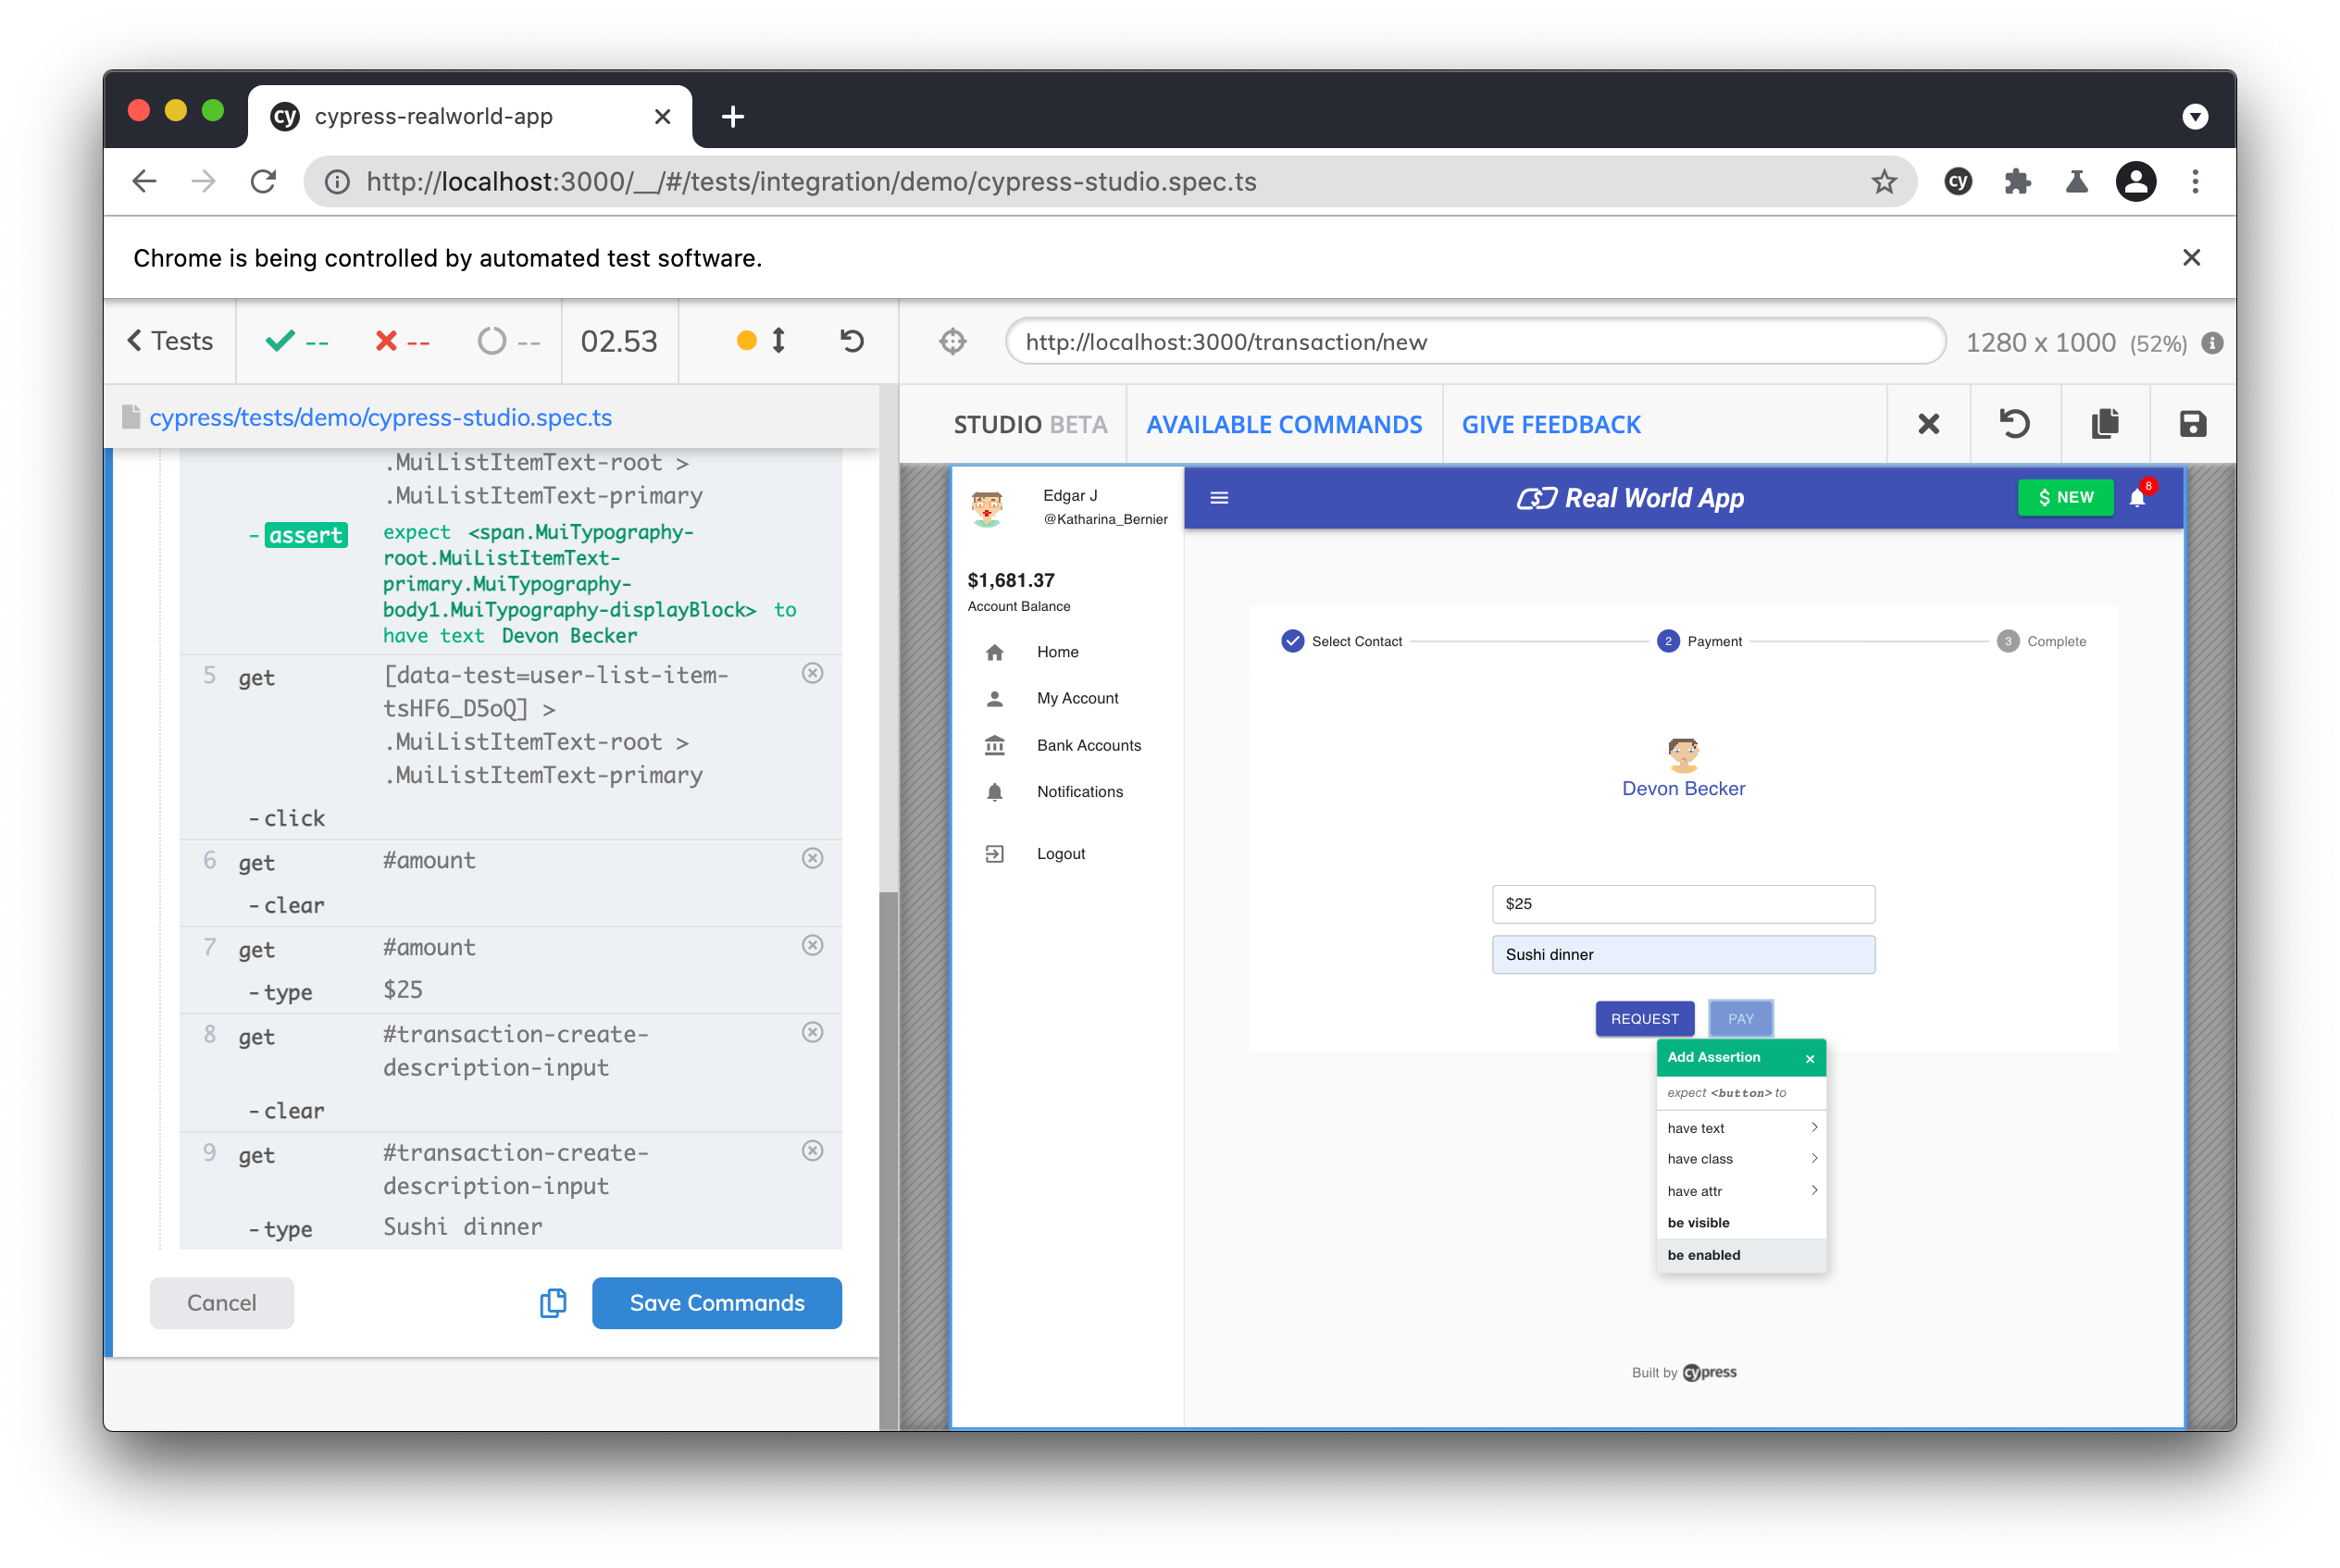
Finally, we will click the "Pay" button and get presented with a confirmation page of our new transaction.
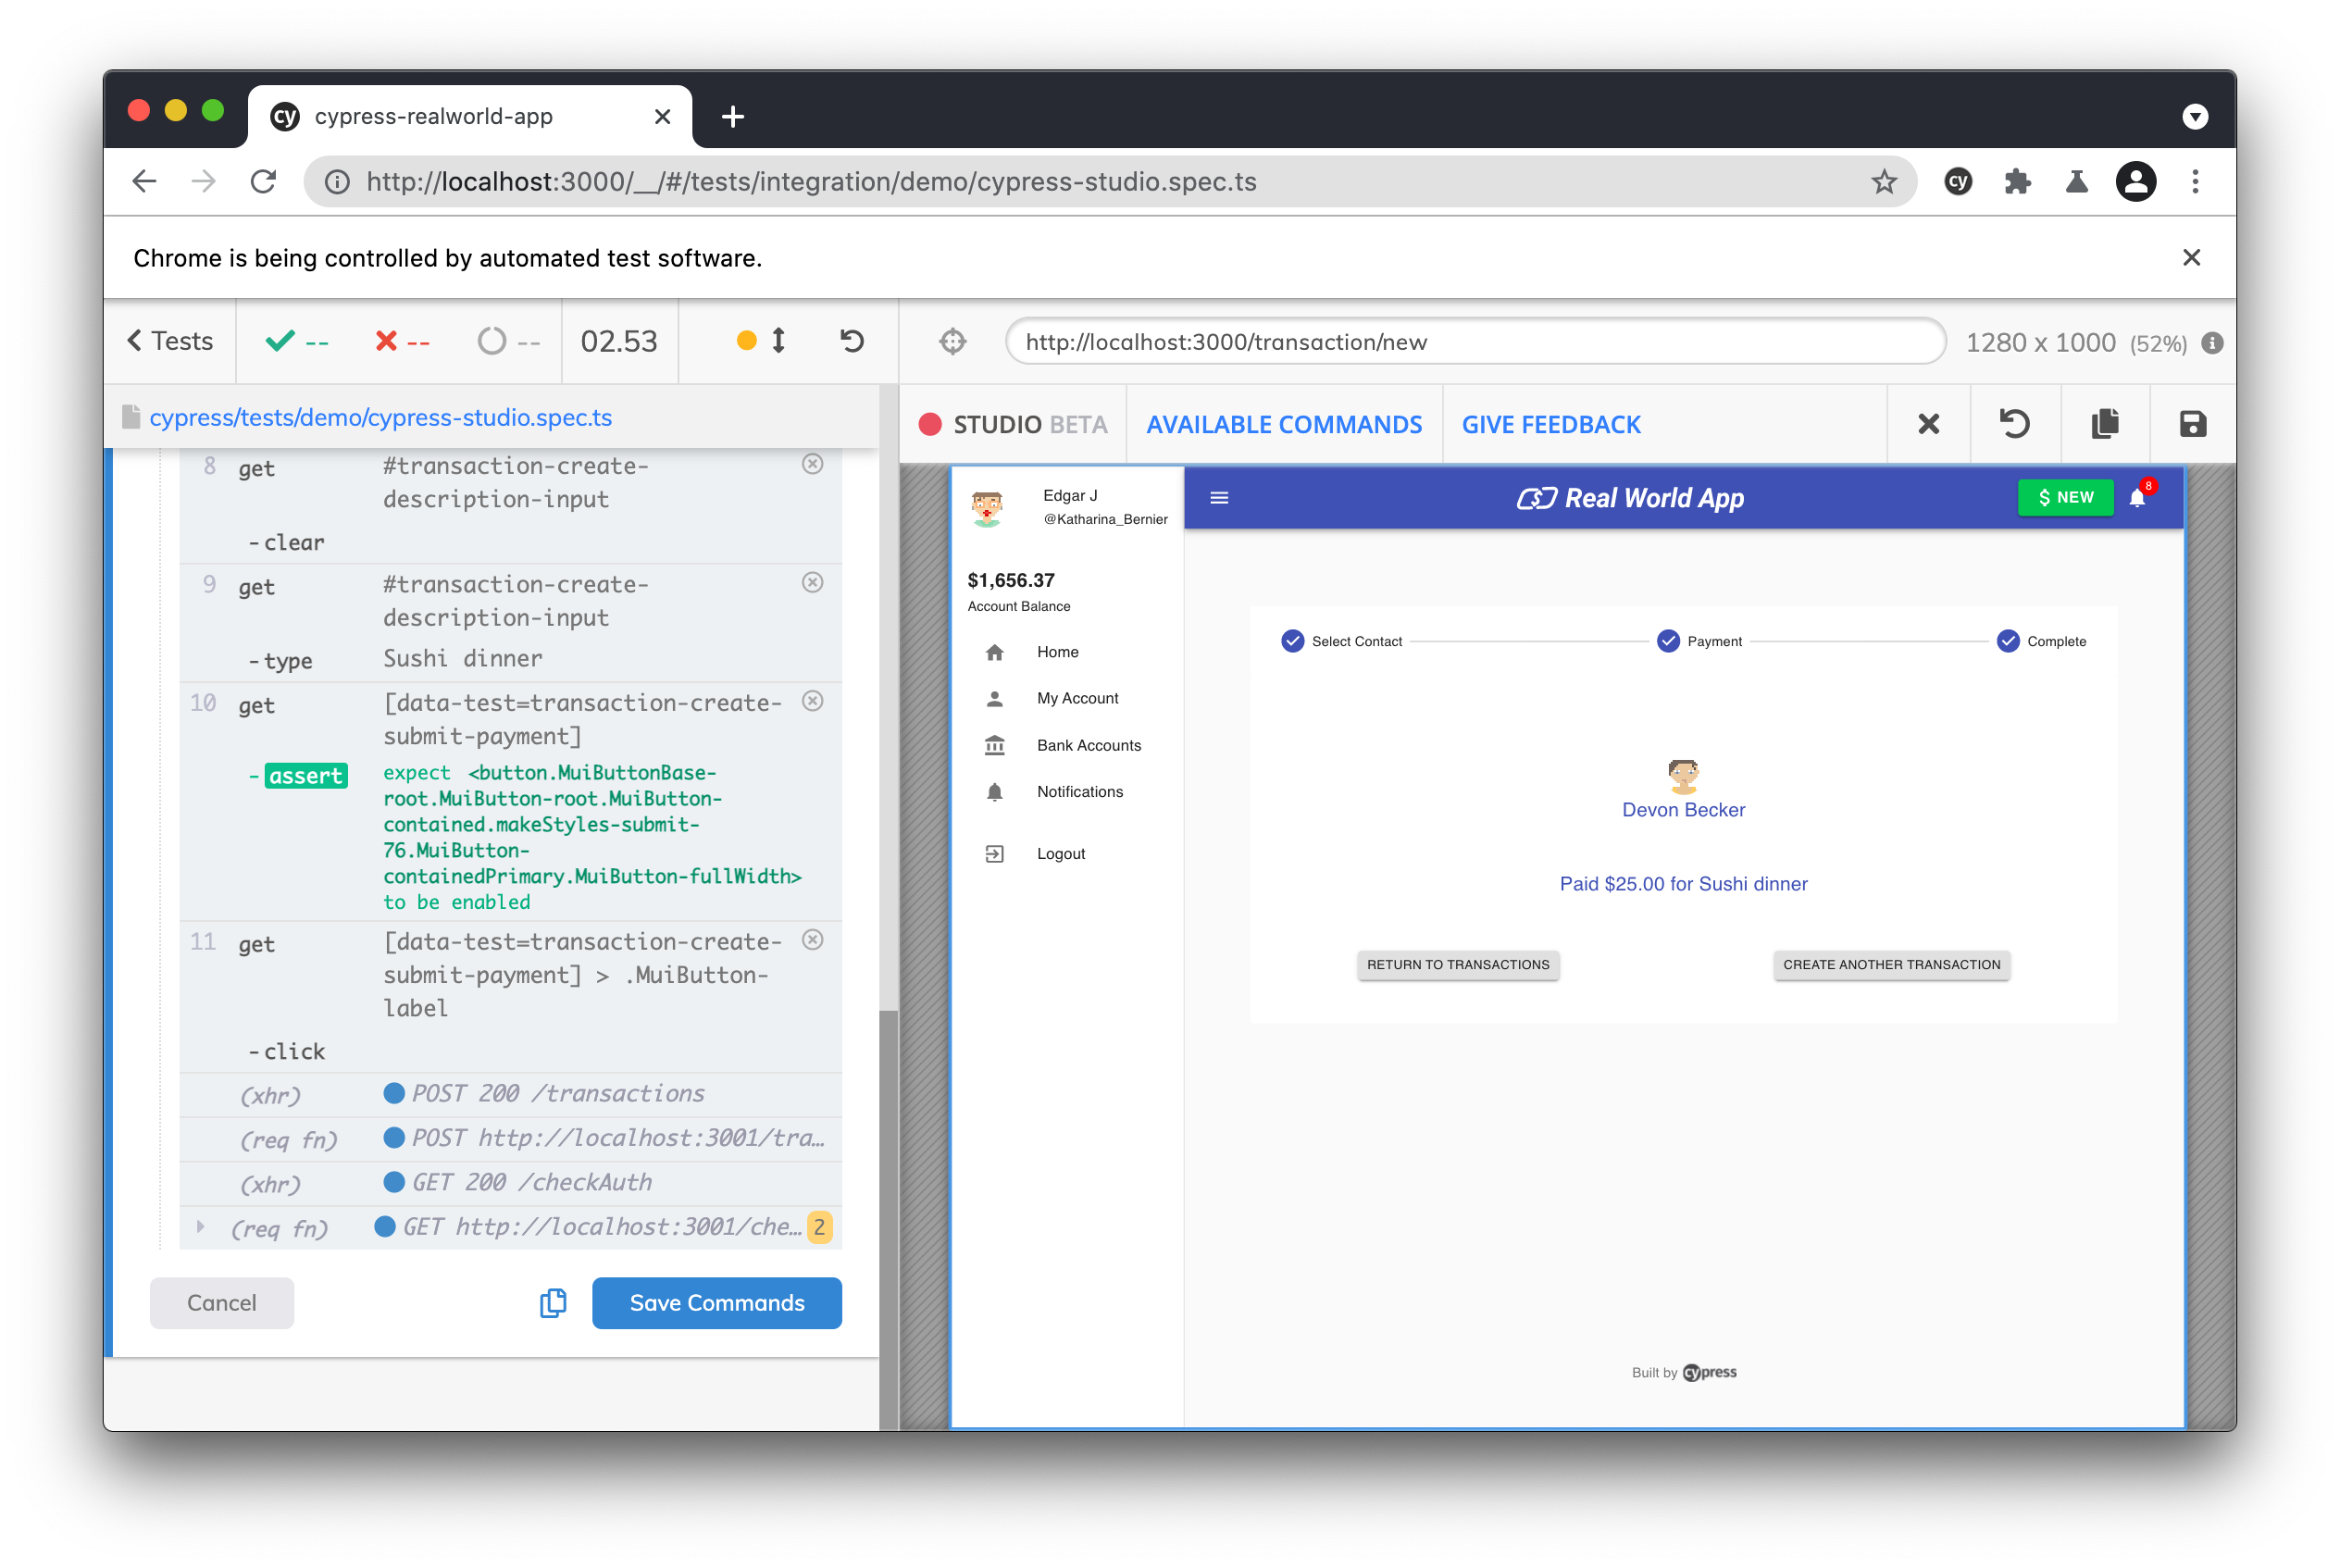
To discard the interactions, click the "Cancel" button to exit Cypress Studio. If satisfied with the interactions with the application, click "Save Commands" and the test code will be saved to your spec file. Alternatively you can choose the "copy" button in order to copy the generated commands to your clipboard.
Generated Test Code
Viewing our test code, we can see that the test is updated after clicking "Save Commands" with the actions we recorded in Cypress Studio.
// Code from Real World App (RWA)
describe('Cypress Studio Demo', () => {
  beforeEach(() => {
    // Seed database with test data
    cy.task('db:seed')

    // Login test user
    cy.database('find', 'users').then((user) => {
      cy.login(user.username, 's3cret', true)
    })
  })

  it('create new transaction', () => {
    /* ==== Generated with Cypress Studio ==== */
    cy.get('[data-test=nav-top-new-transaction]').click()
    cy.get('[data-test=user-list-search-input]').clear()
    cy.get('[data-test=user-list-search-input]').type('dev')
    cy.get(
      '[data-test=user-list-item-tsHF6_D5oQ] > .MuiListItemText-root > .MuiListItemText-primary'
    ).should('have.text', 'Devon Becker')
    cy.get('[data-test=user-list-item-tsHF6_D5oQ]').click()
    cy.get('#amount').clear()
    cy.get('#amount').type('$25')
    cy.get('#transaction-create-description-input').clear()
    cy.get('#transaction-create-description-input').type('Sushi dinner')
    cy.get('[data-test=transaction-create-submit-payment]').should('be.enabled')
    cy.get('[data-test=transaction-create-submit-payment]').click()
    /* ==== End Cypress Studio ==== */
  })
})
Adding a New Test
You can add a new test to any existing describe or context block, by
clicking "Add New Test" on our defined describe block.
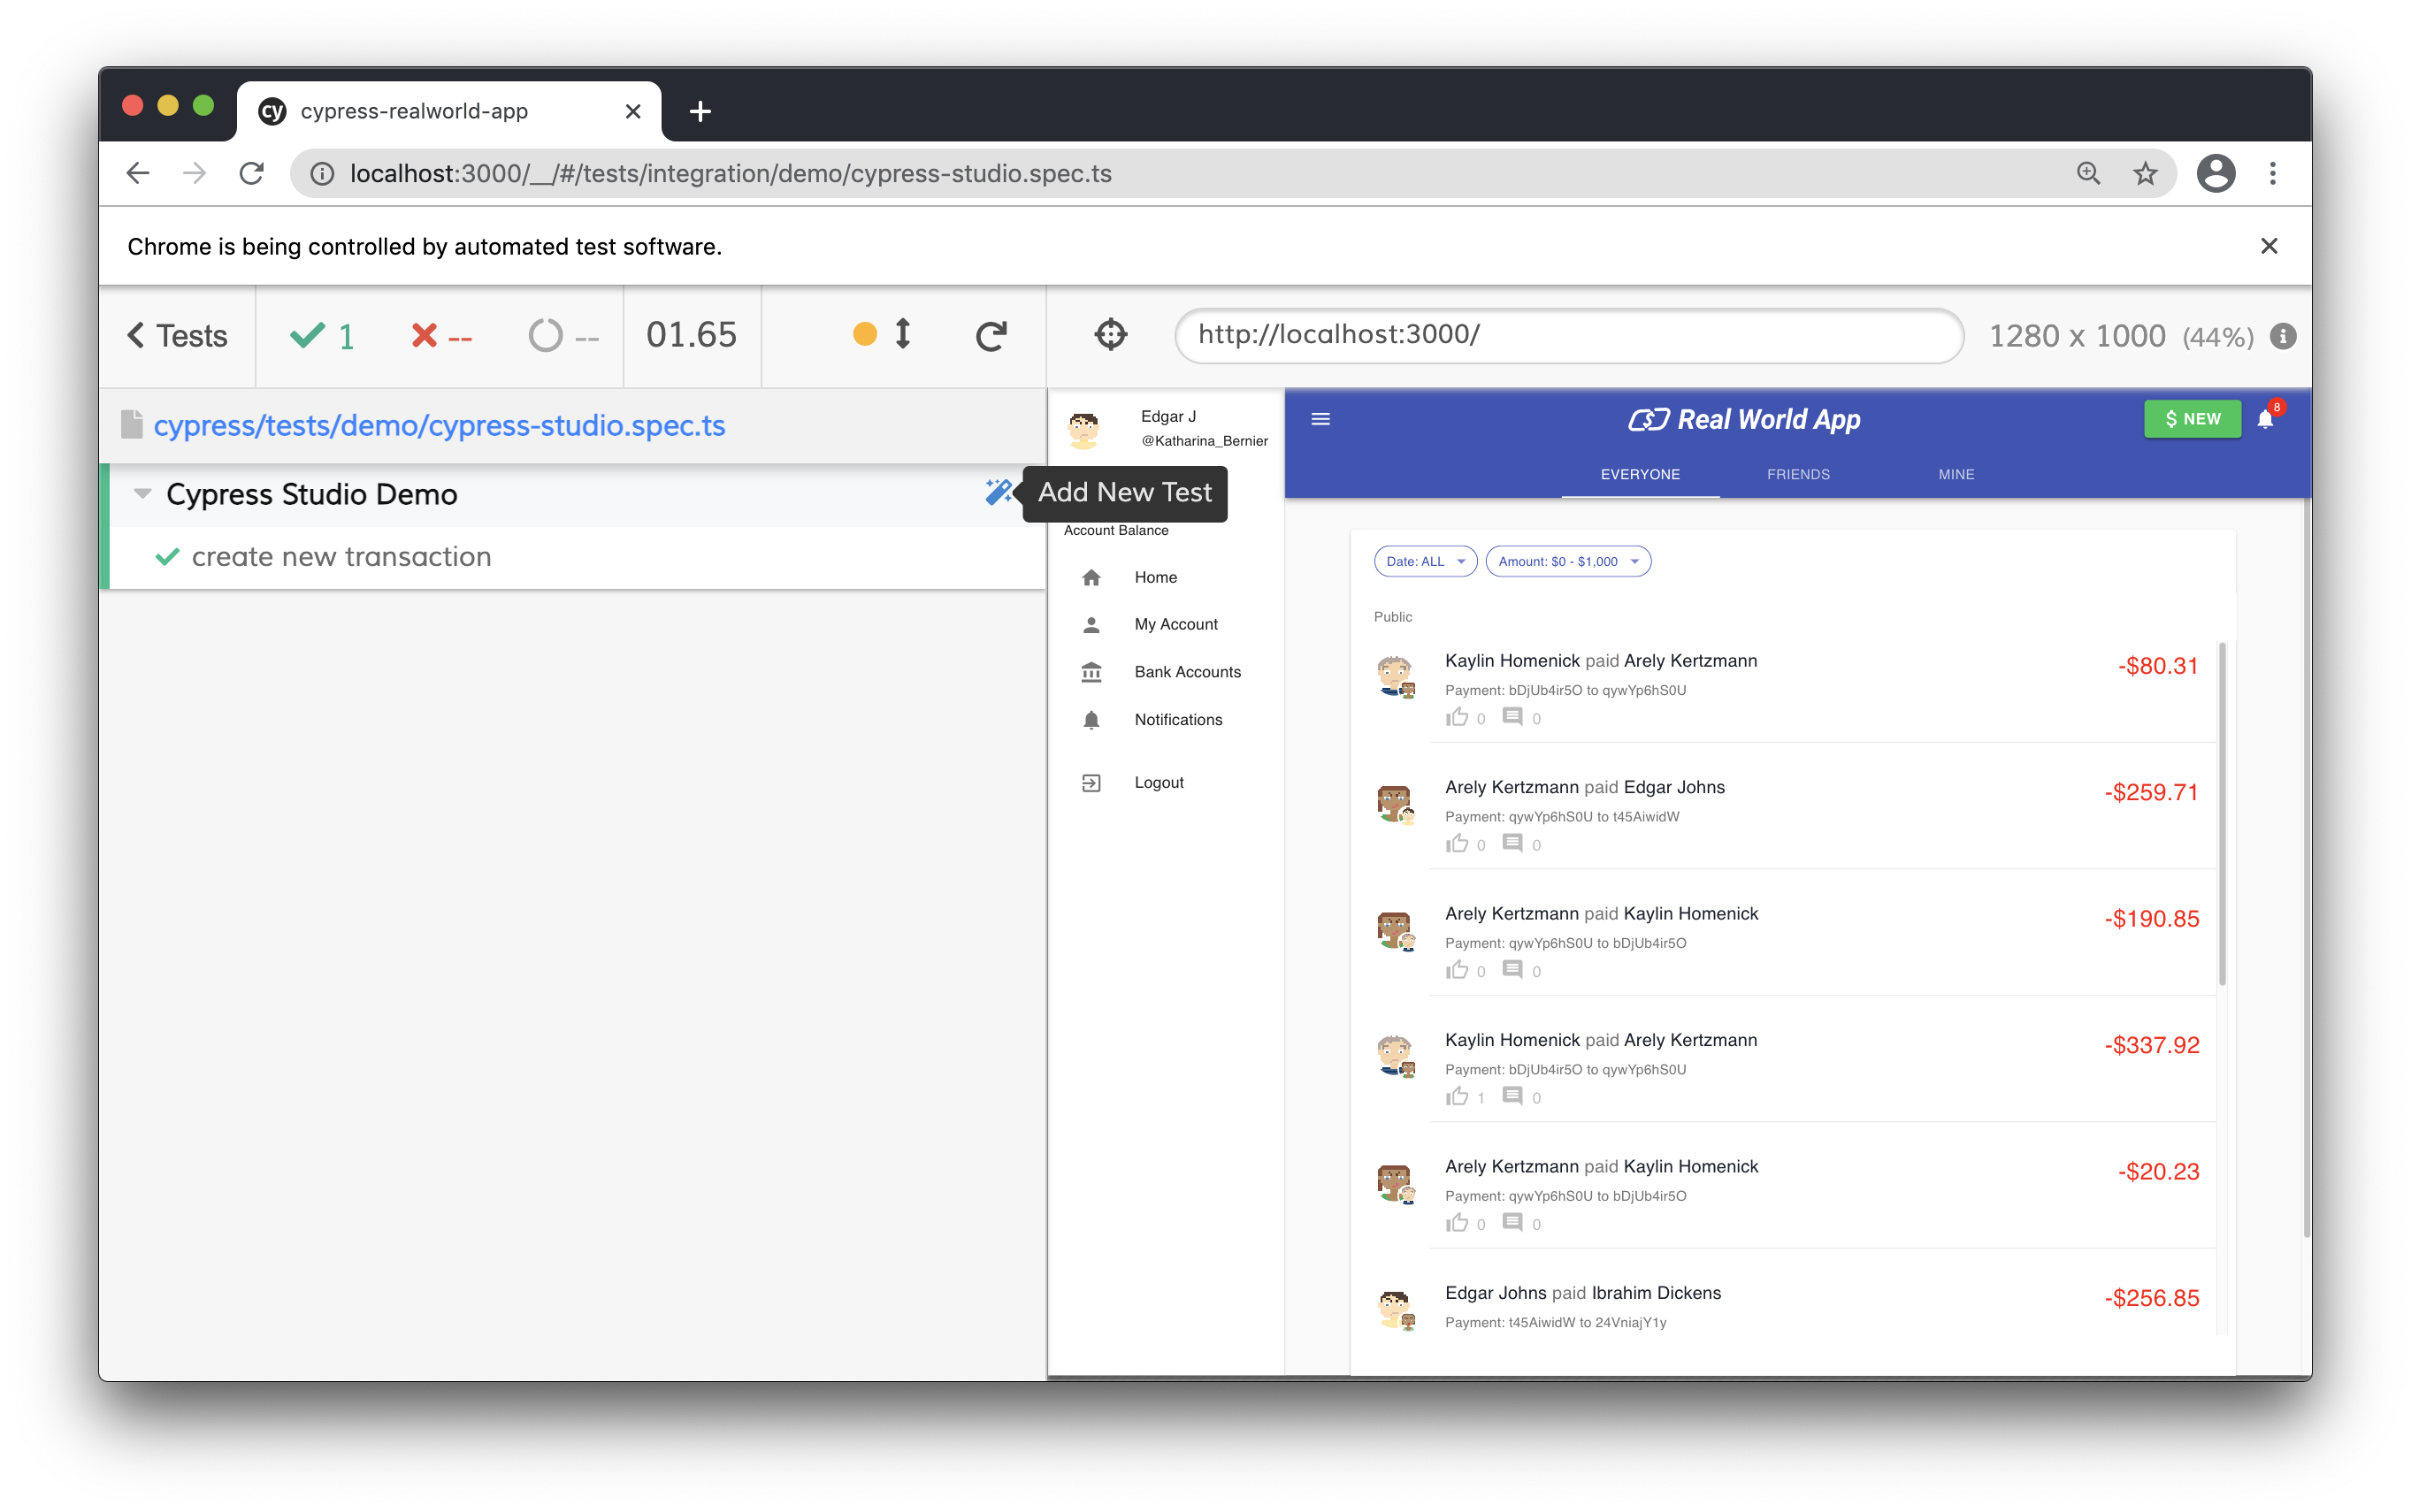
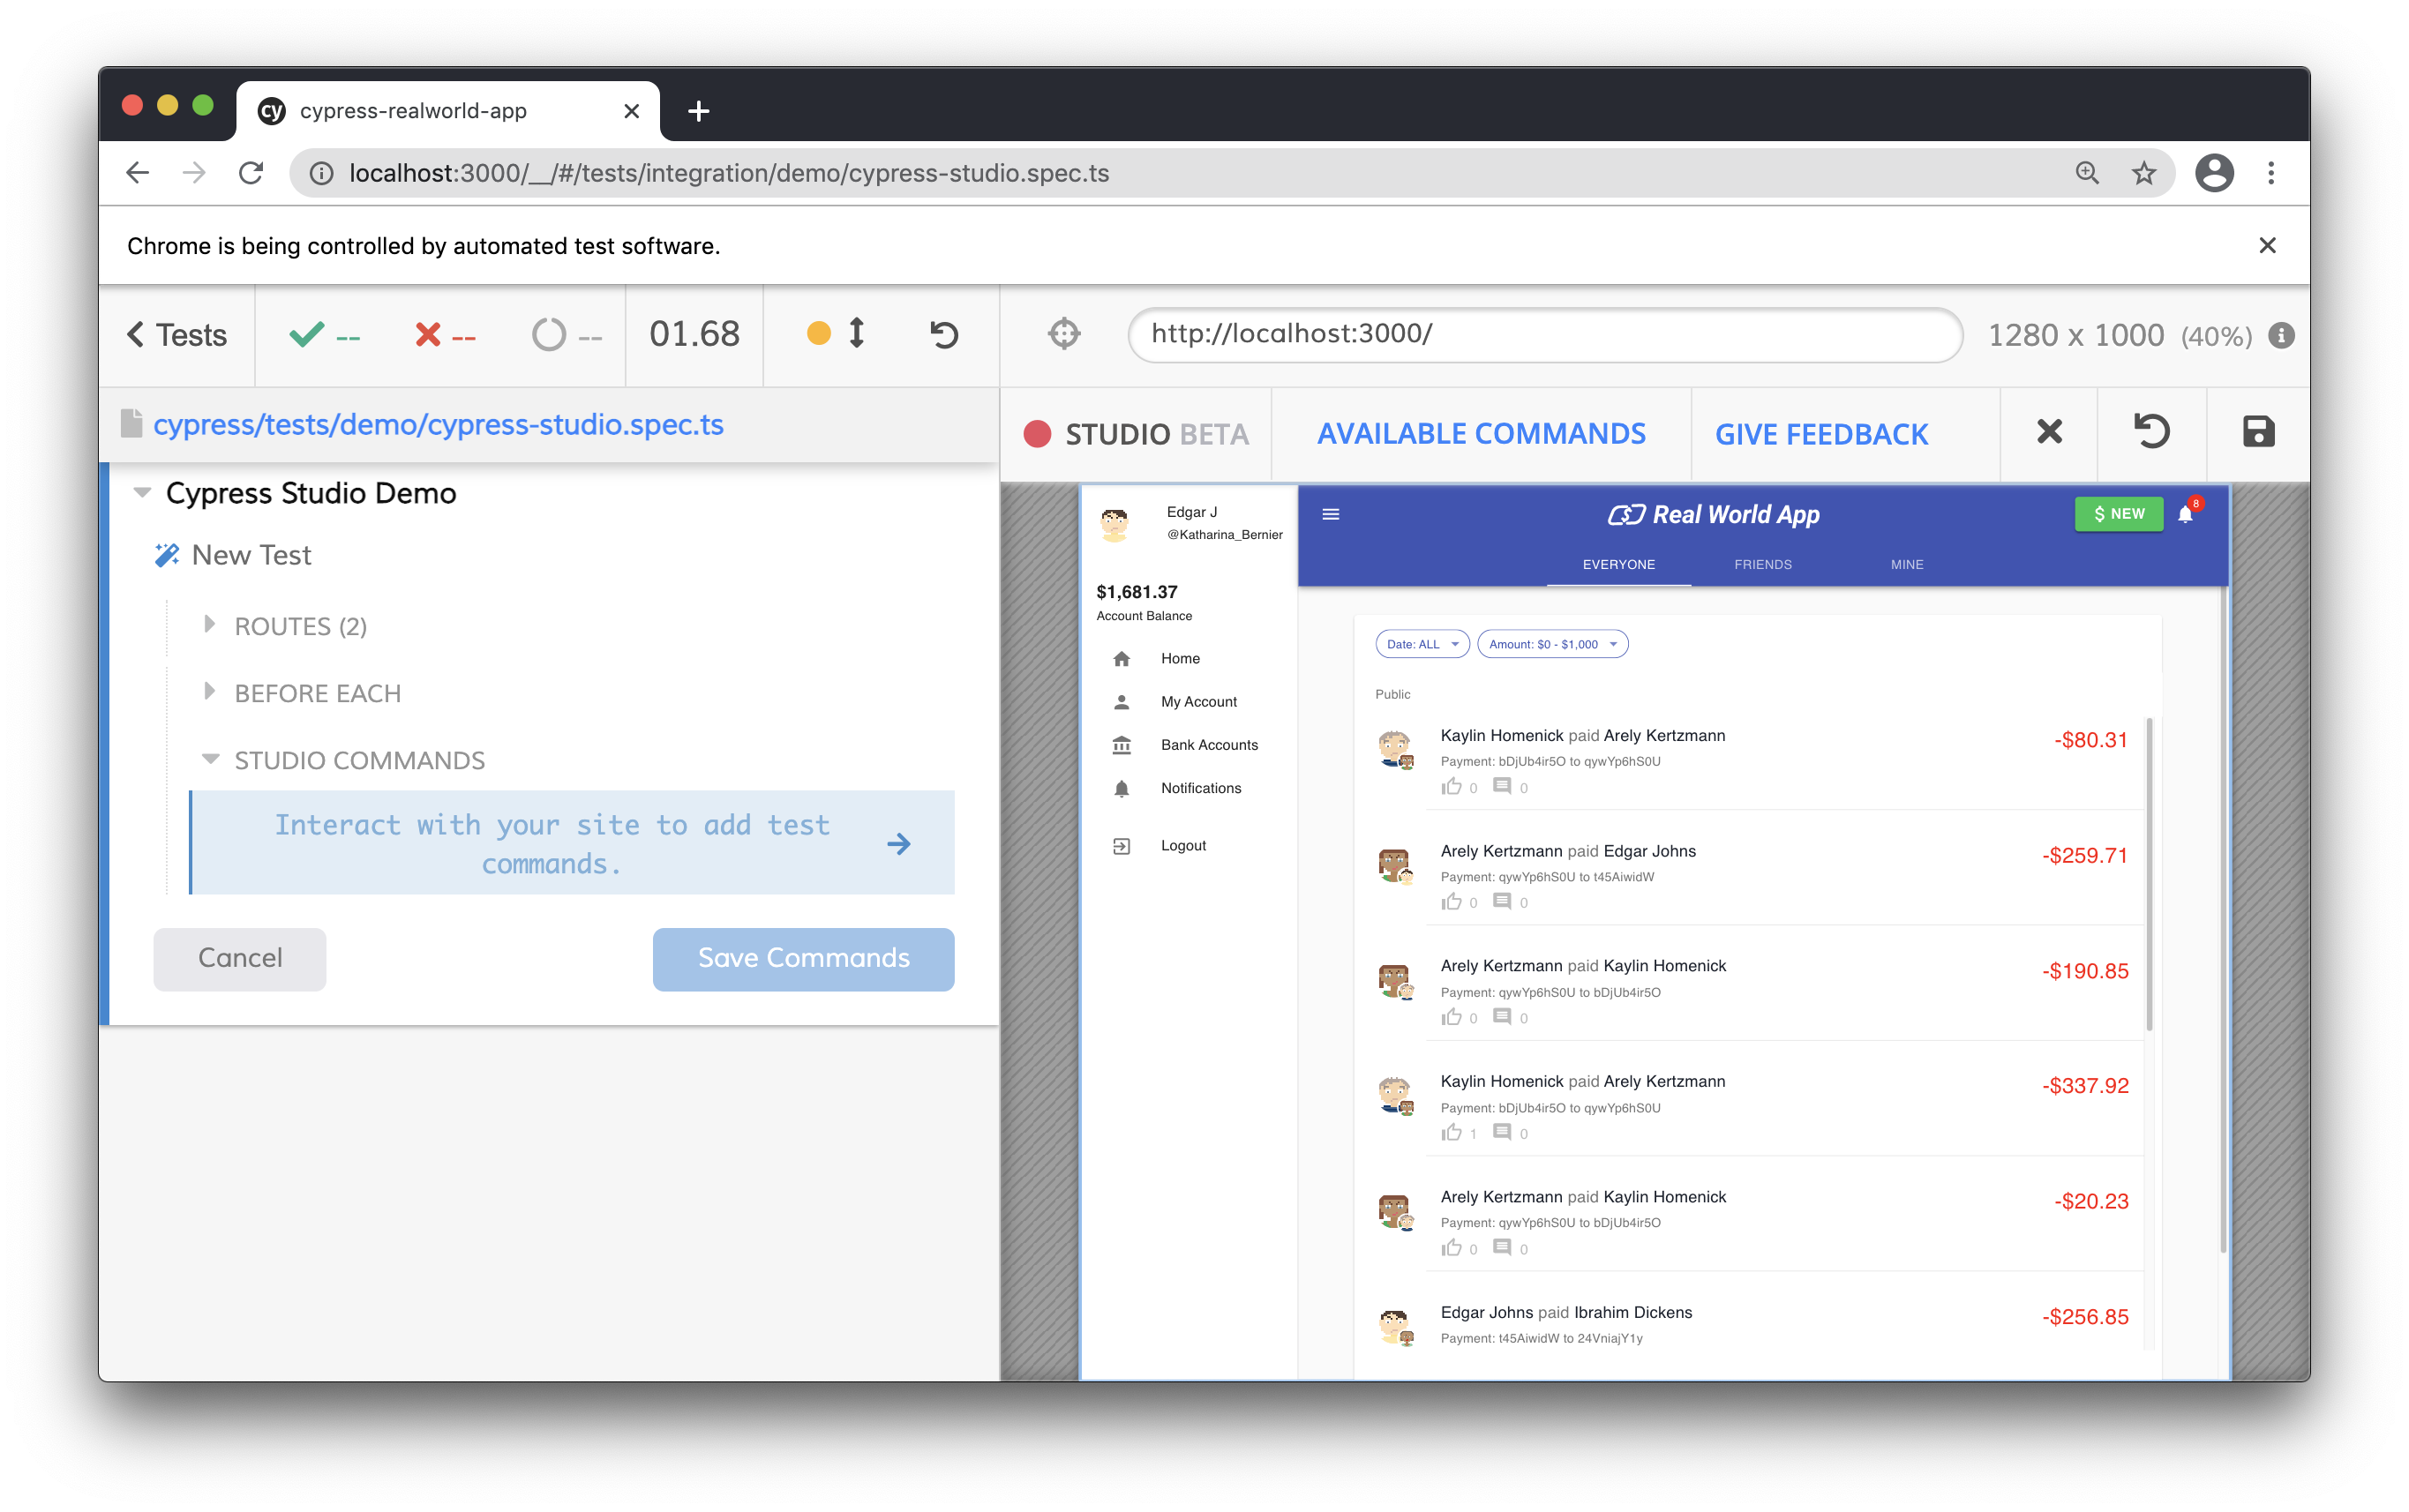
We are launched into Cypress Studio and can begin interacting with our application to generate the test.
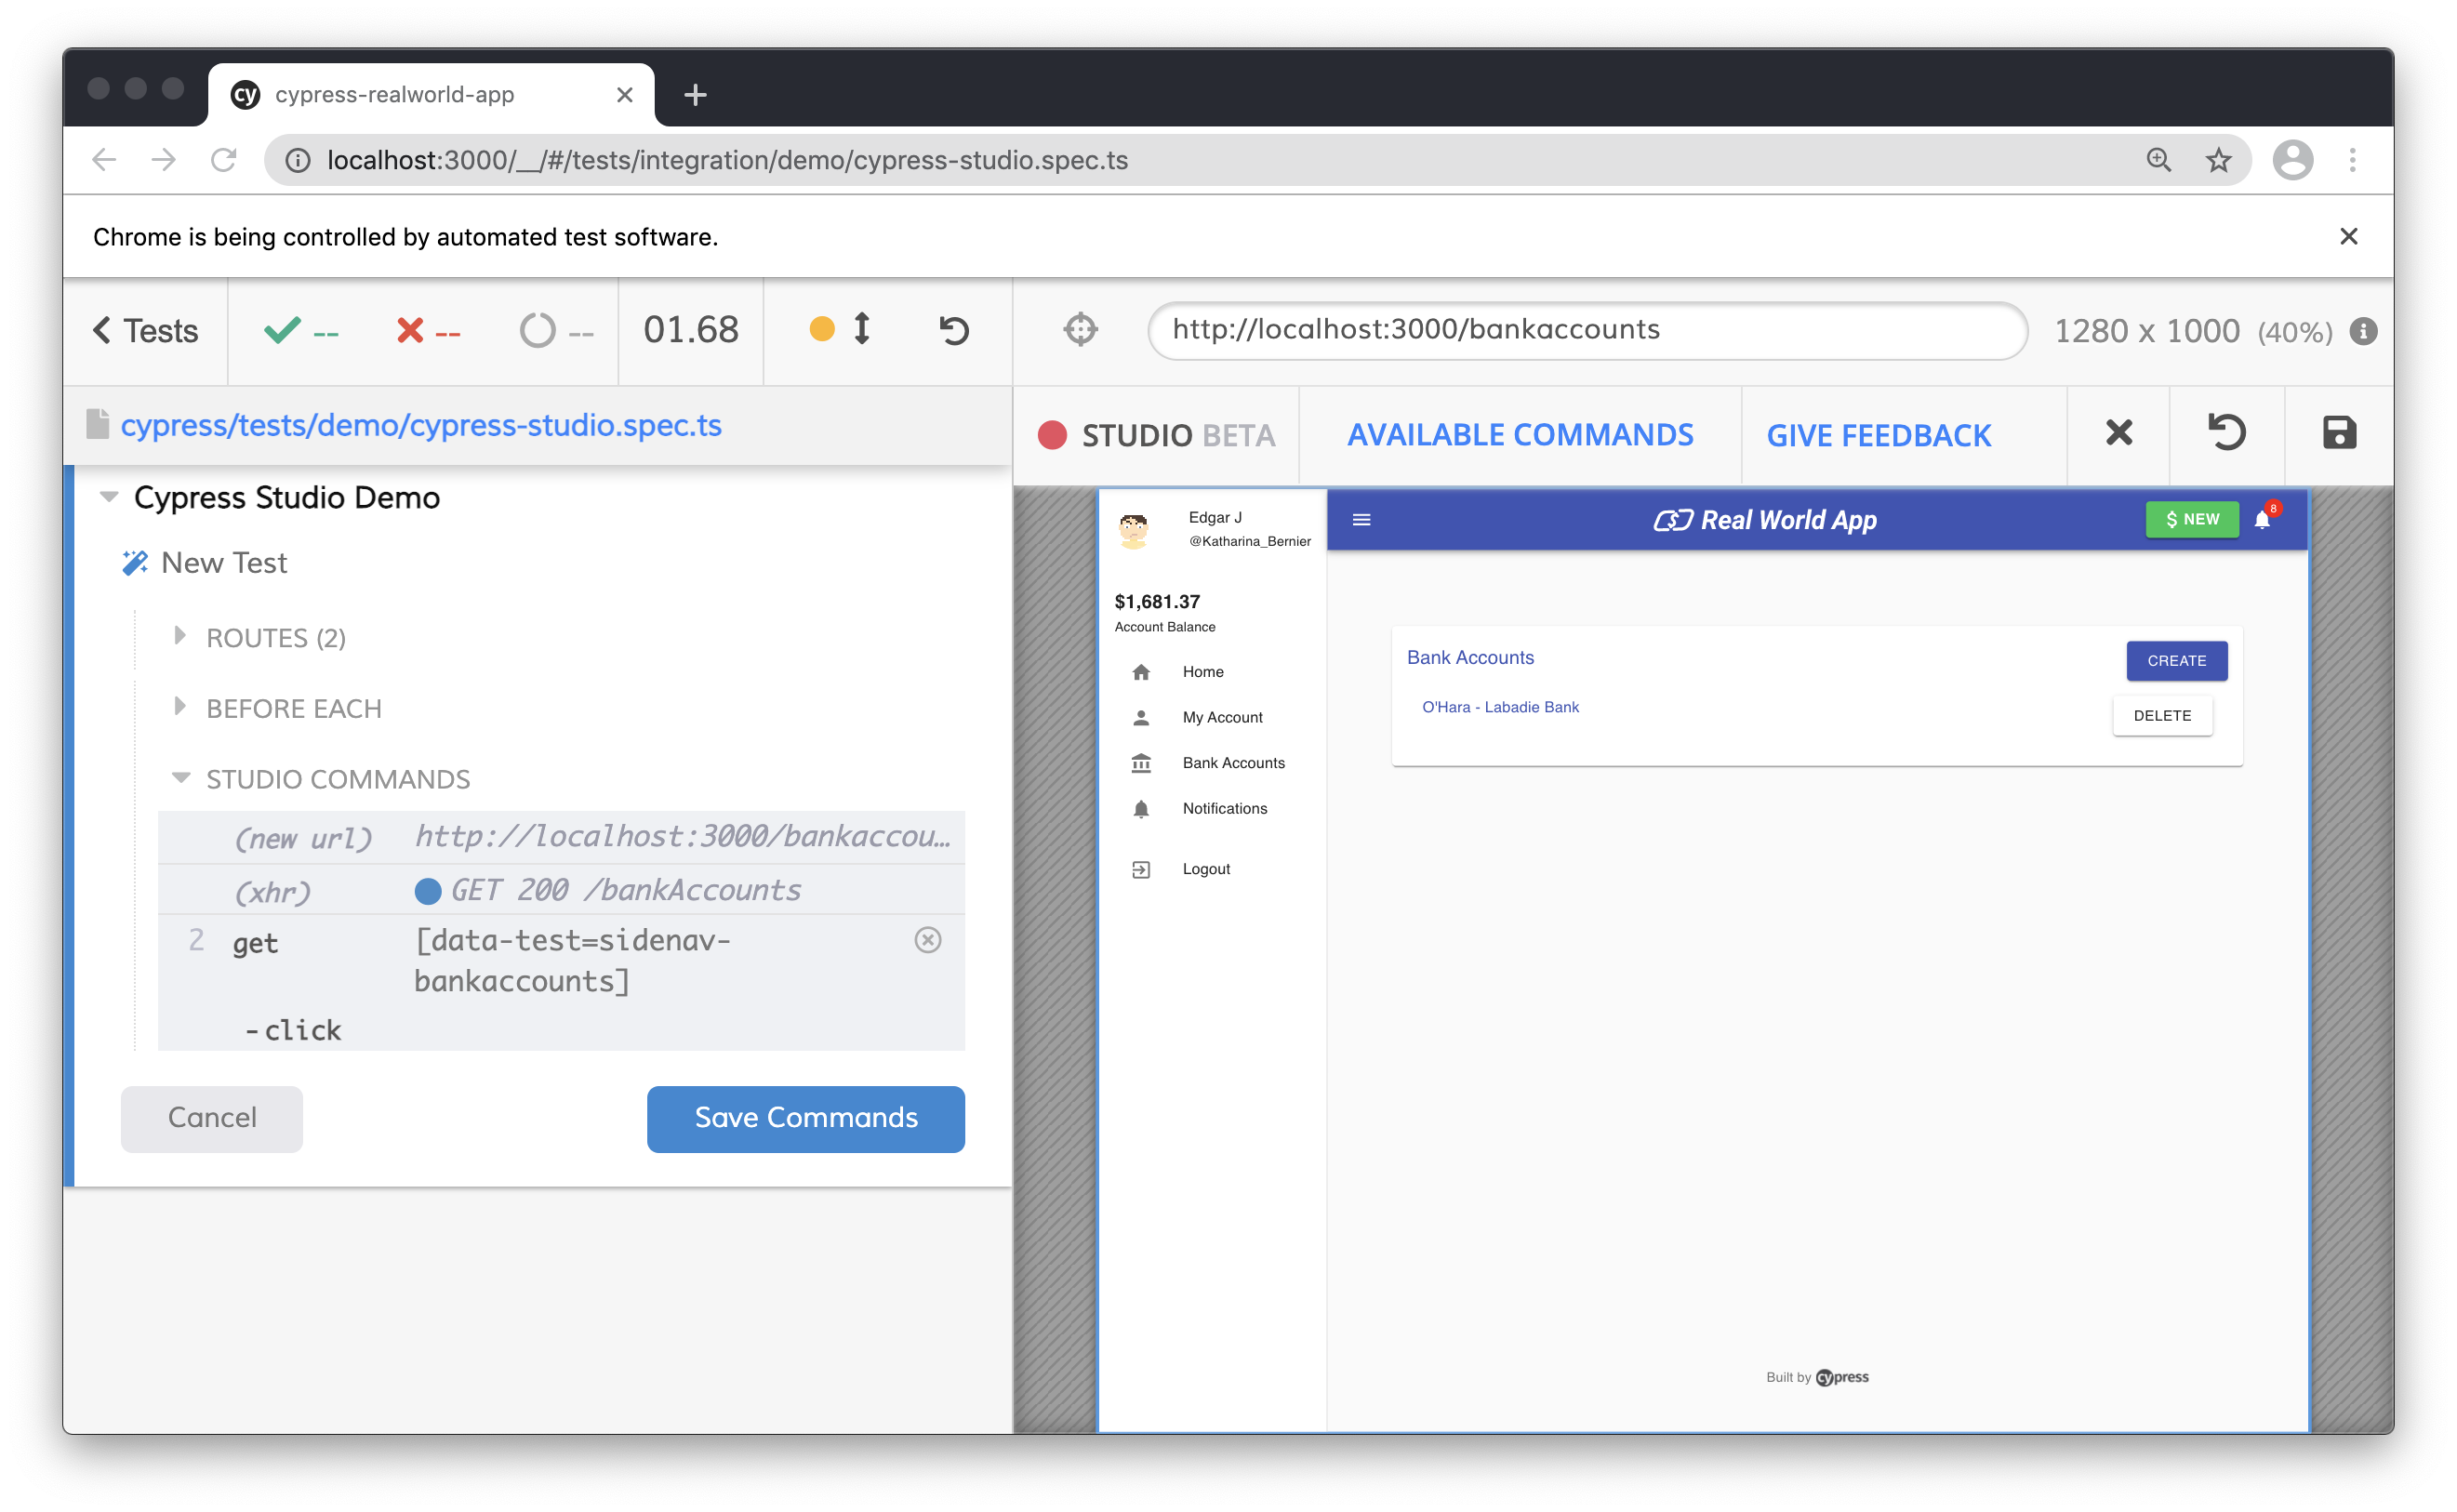
For this test, we will add a new bank account. Our interactions are as follows:
- Click "Bank Accounts" in left hand navigation
- Click the "Create" button on Bank Accounts page
- Fill out the bank account information
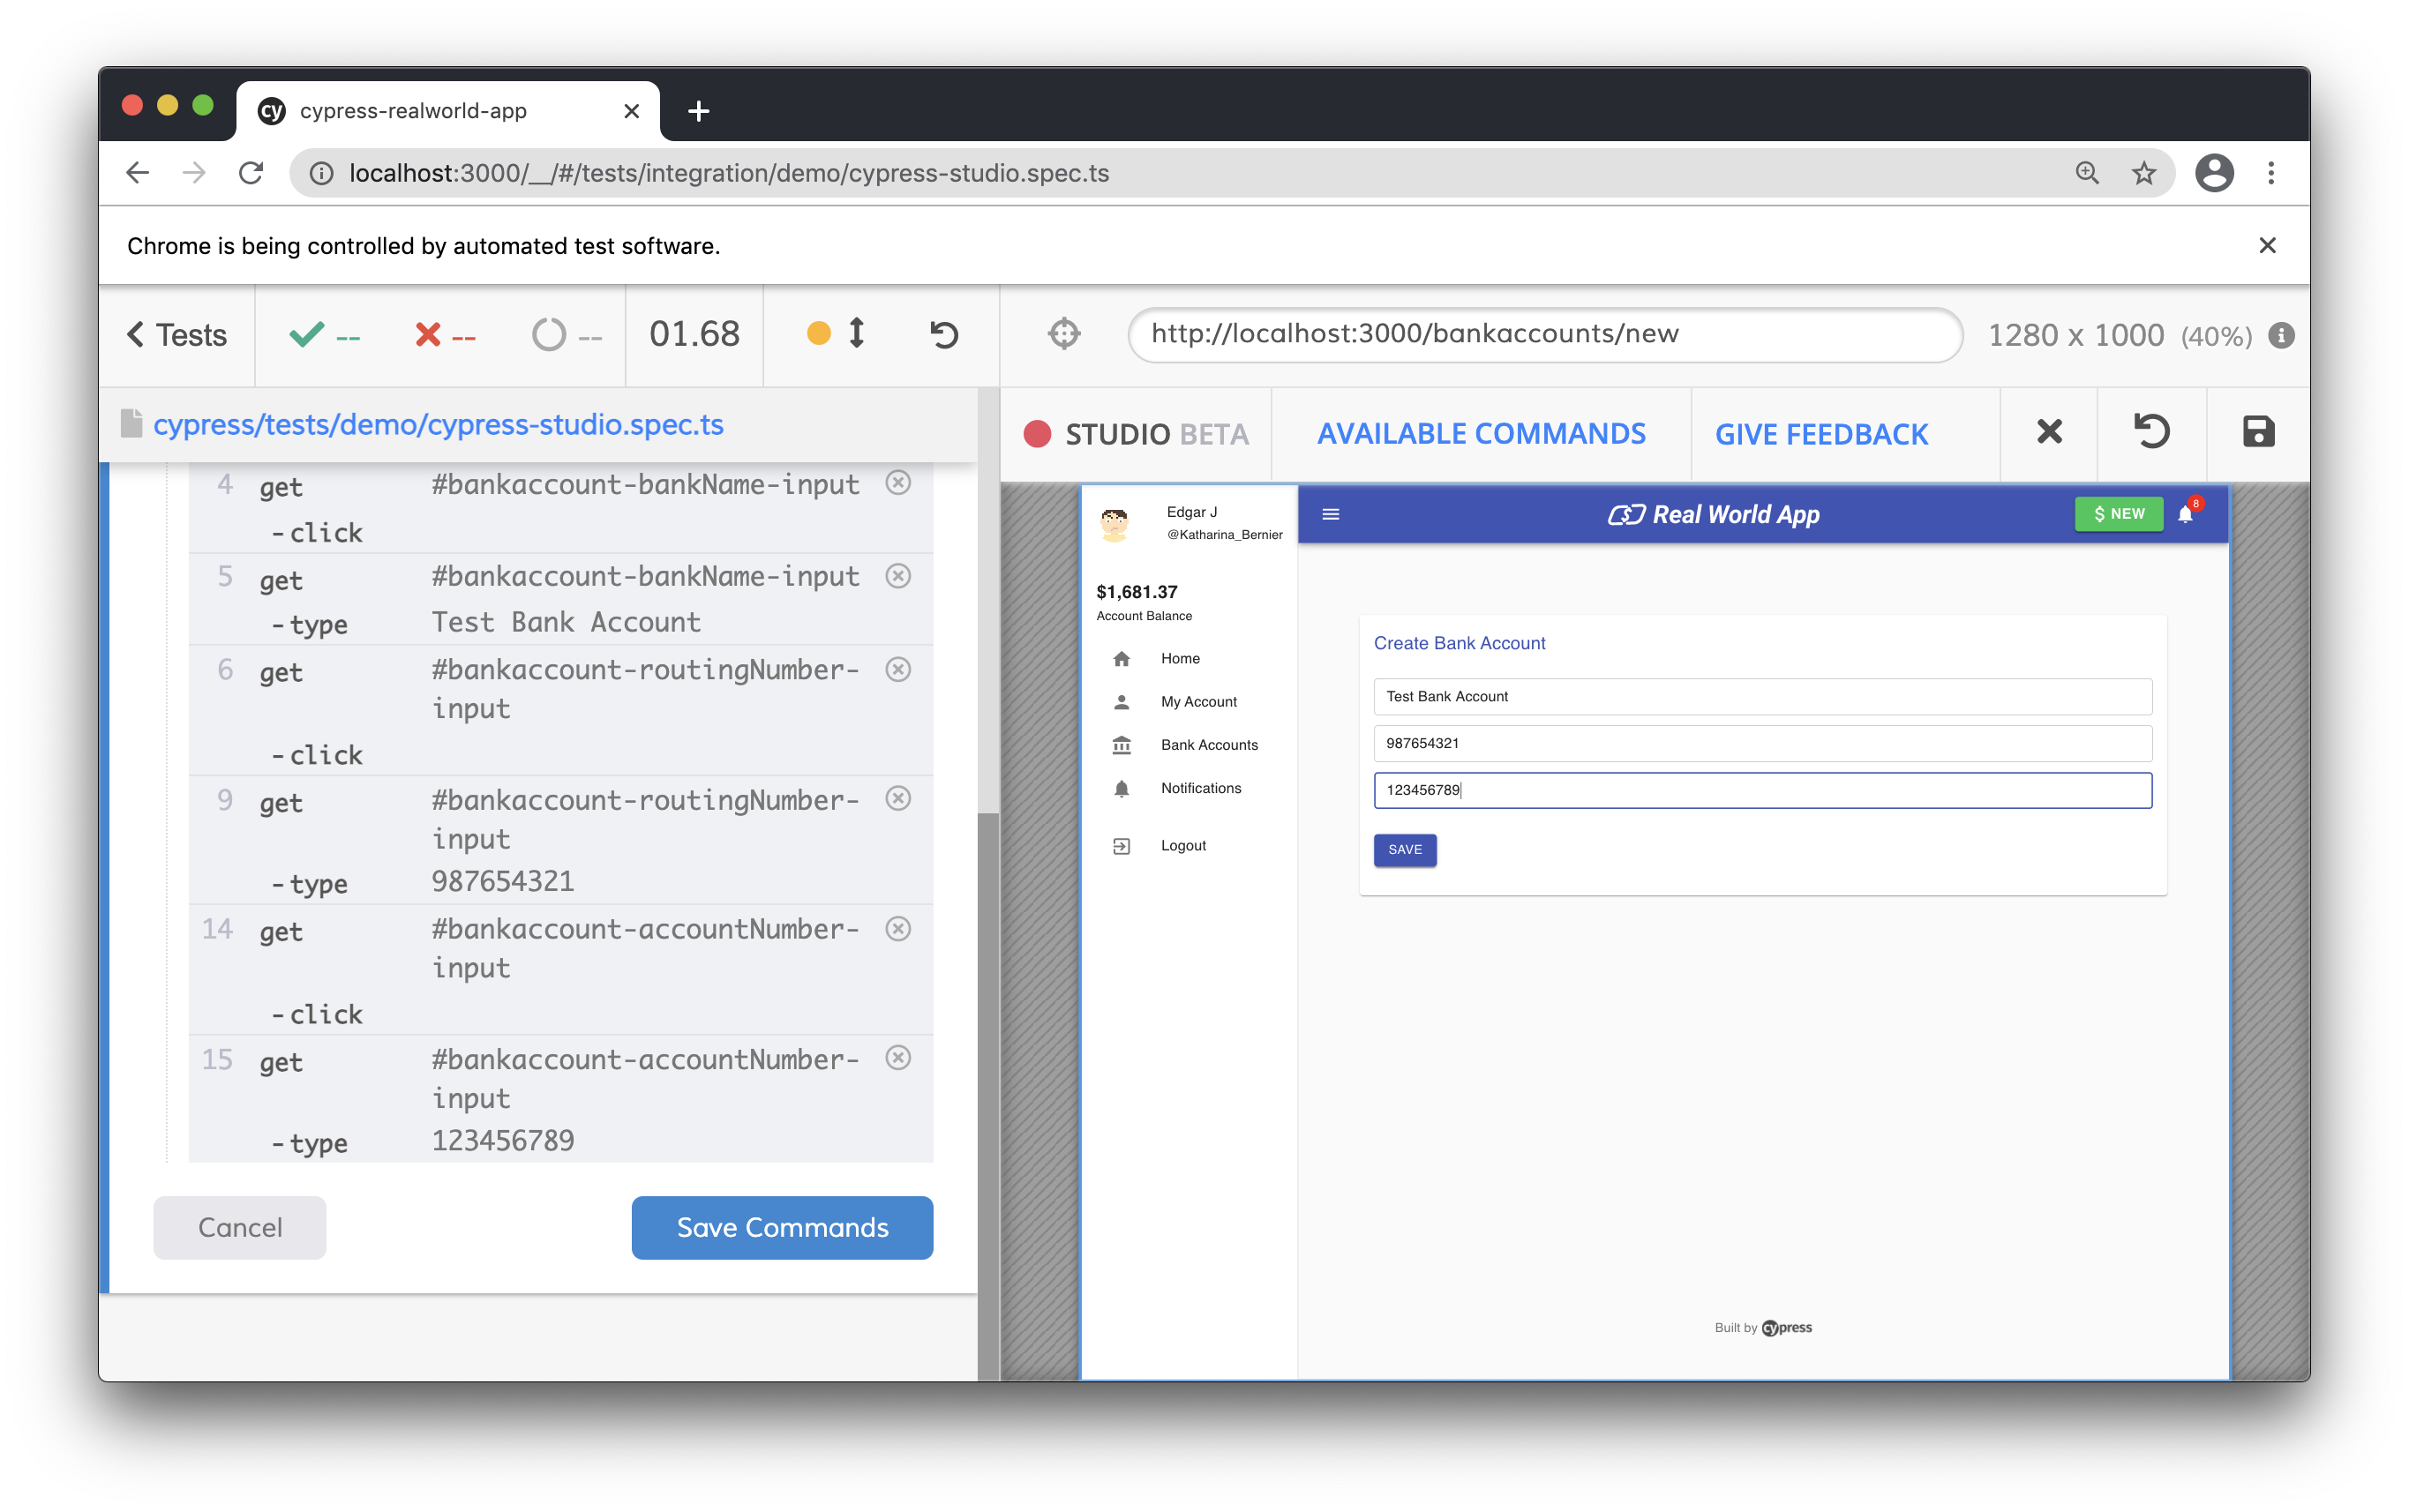
- Click the "Save" button
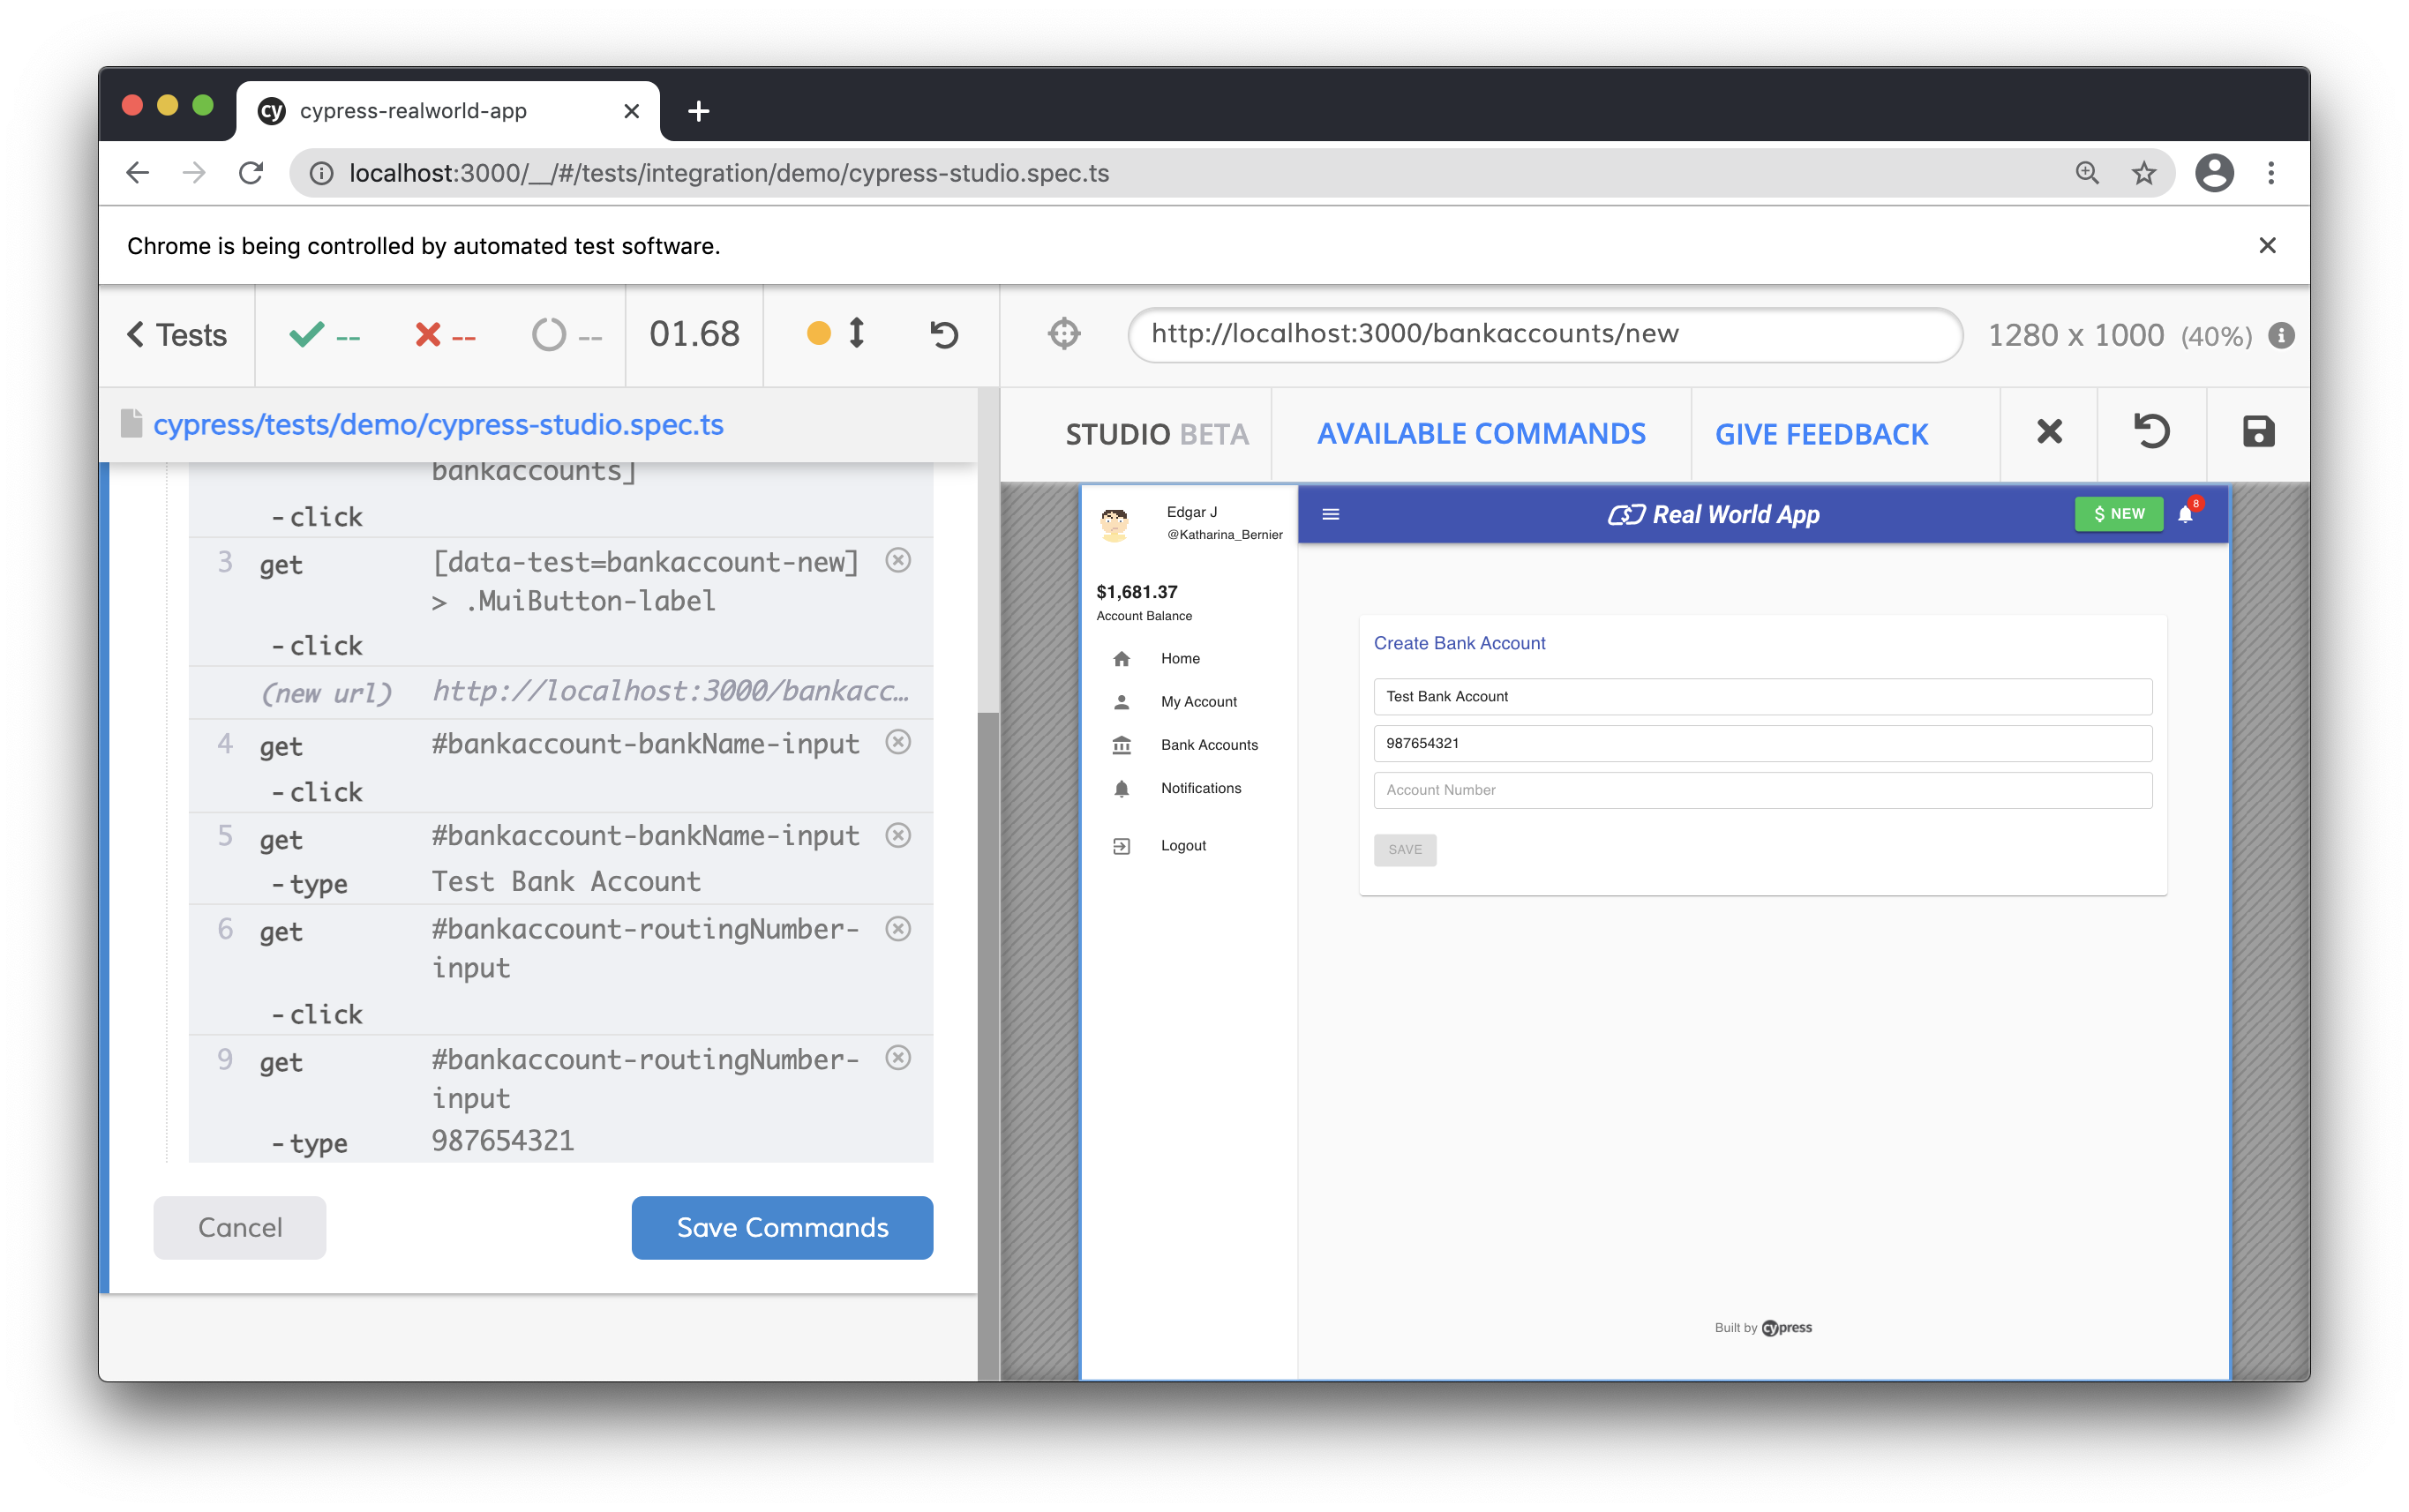
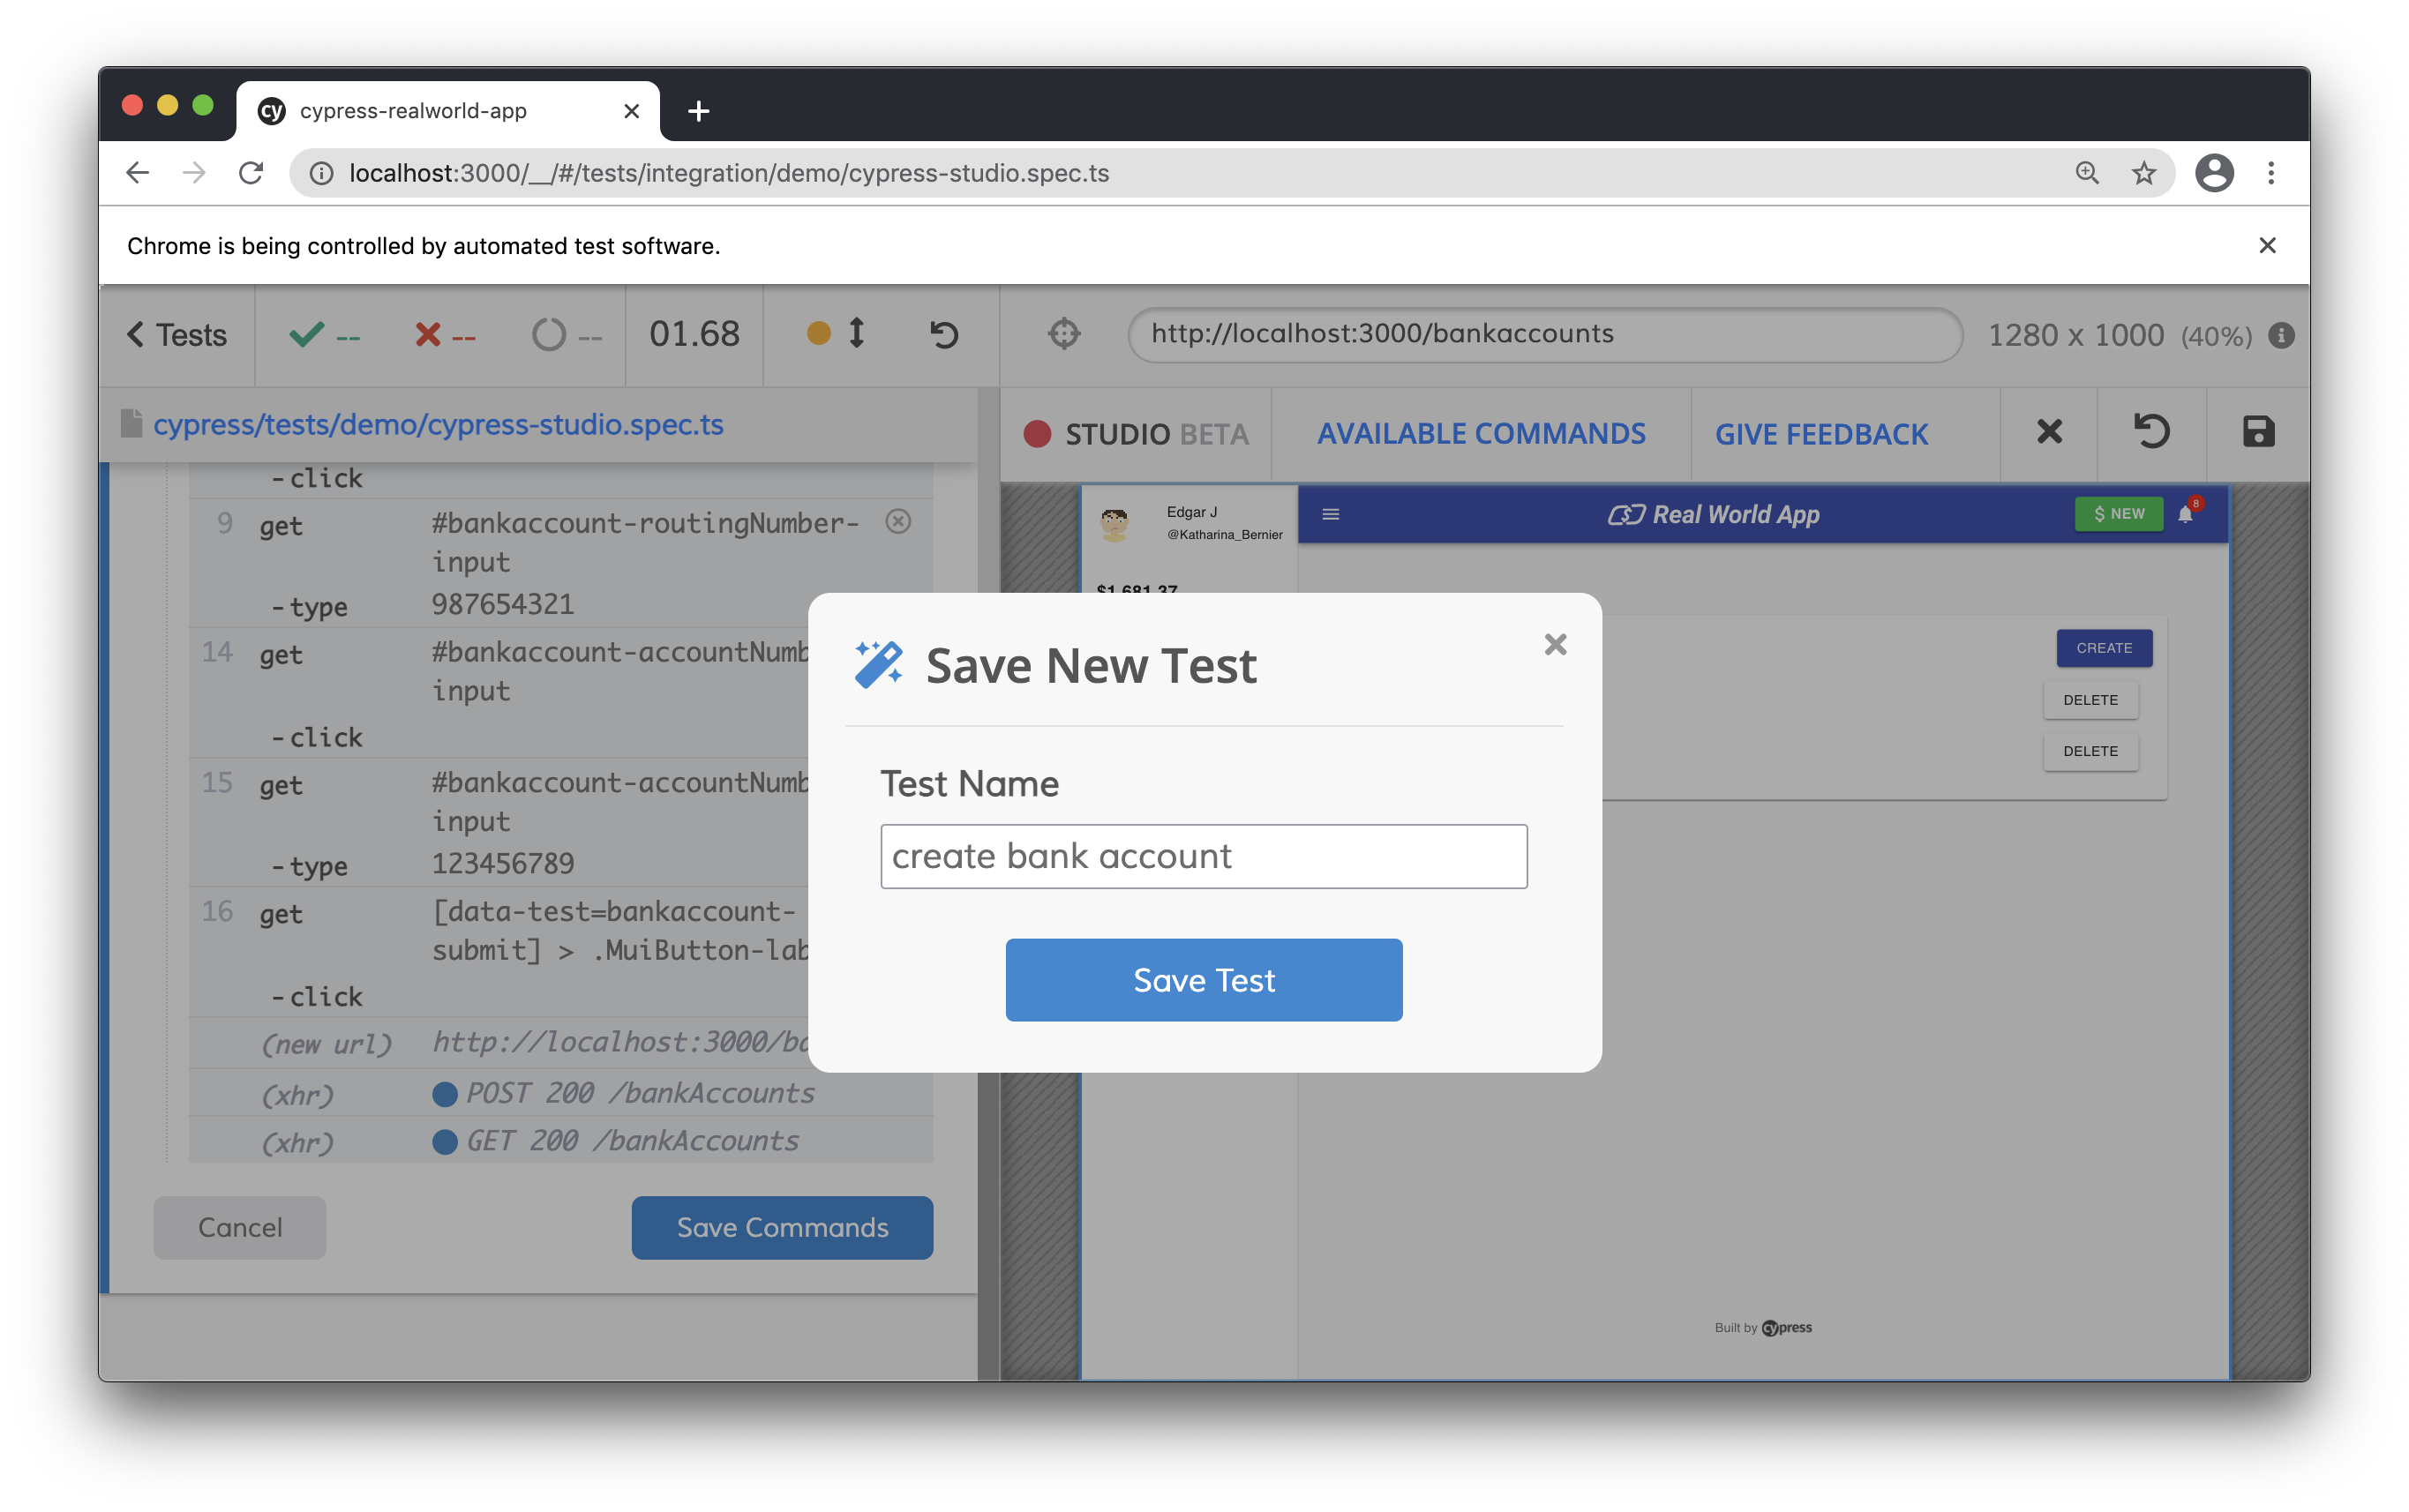
To discard the interactions, click the "Cancel" button to exit Cypress Studio.
If satisfied with the interactions with the application, click "Save Commands" and prompt will ask for the name of the test. Click "Save Test" and the test will be saved to the file.
Once saved, the file will be run again in Cypress.
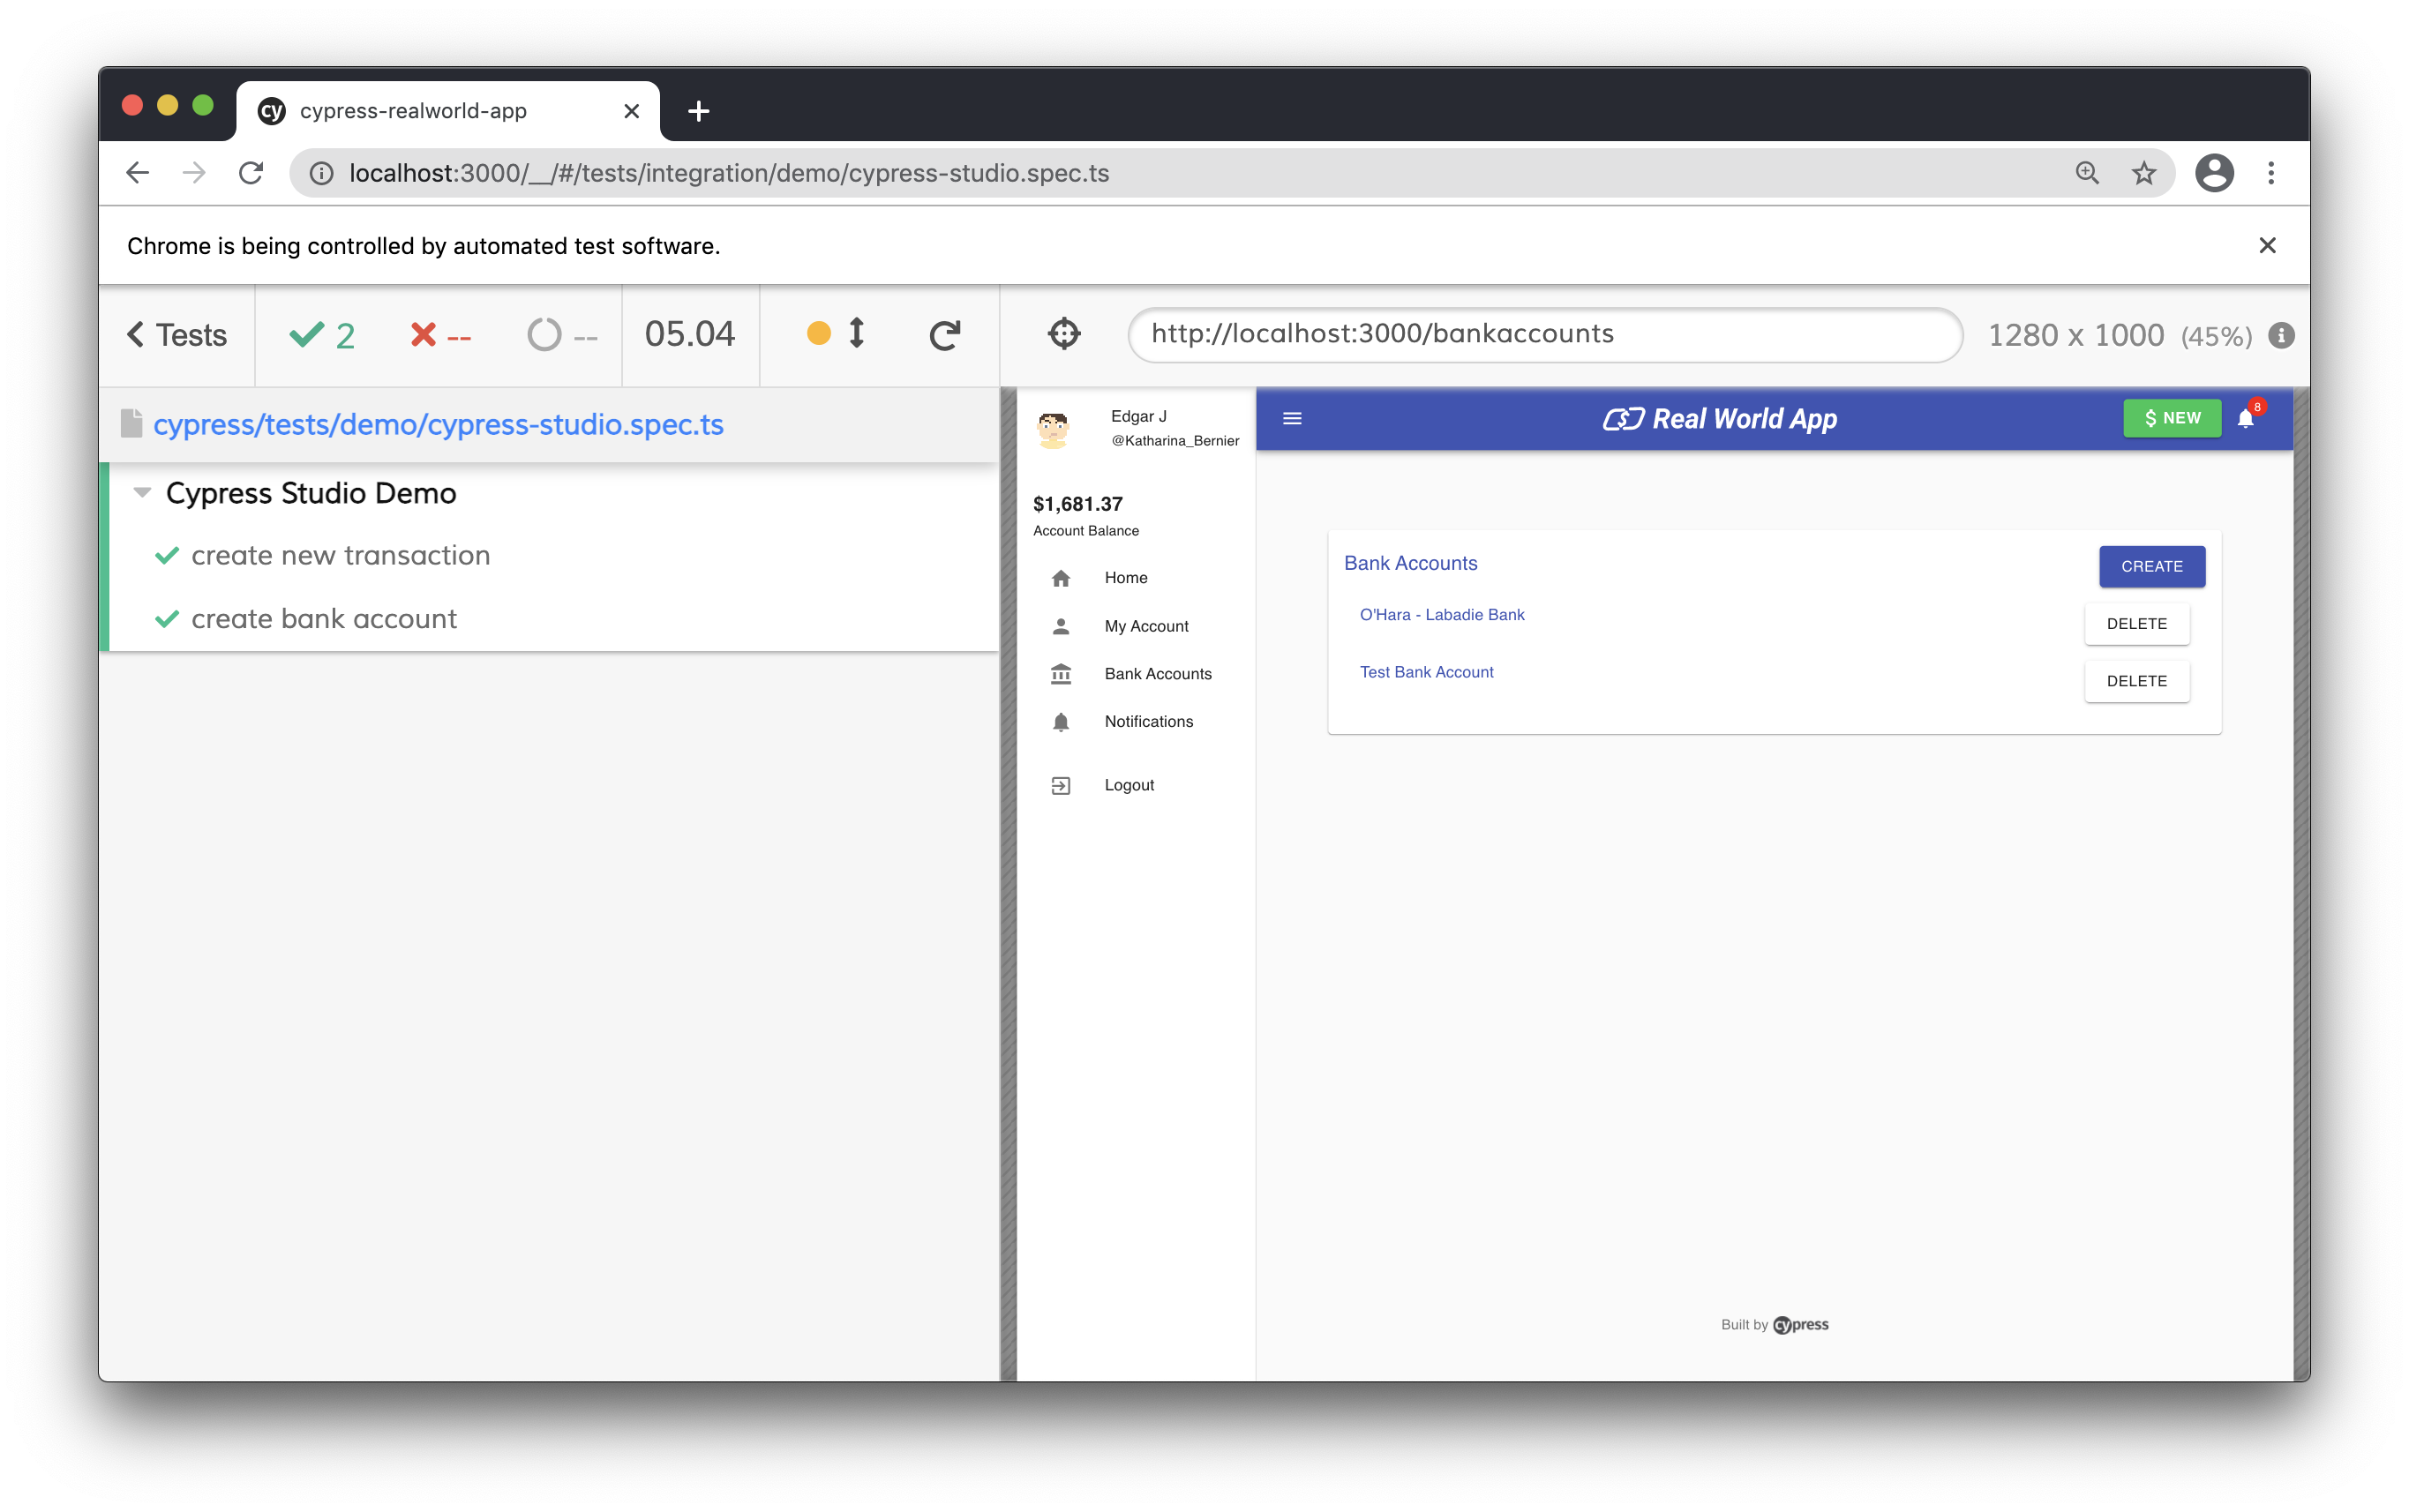
Finally, viewing our test code, we can see that the test is updated after clicking "Save Commands" with the actions we recorded in Cypress Studio.
// Code from Real World App (RWA)
import { User } from 'models'

describe('Cypress Studio Demo', () => {
  beforeEach(() => {
    cy.task('db:seed')

    cy.database('find', 'users').then((user: User) => {
      cy.login(user.username, 's3cret', true)
    })
  })

  it('create new transaction', () => {
    // Extend test with Cypress Studio
  })

  /* === Test Created with Cypress Studio === */
  it('create bank account', function () {
    /* ==== Generated with Cypress Studio ==== */
    cy.get('[data-test=sidenav-bankaccounts]').click()
    cy.get('[data-test=bankaccount-new] > .MuiButton-label').click()
    cy.get('#bankaccount-bankName-input').click()
    cy.get('#bankaccount-bankName-input').type('Test Bank Account')
    cy.get('#bankaccount-routingNumber-input').click()
    cy.get('#bankaccount-routingNumber-input').type('987654321')
    cy.get('#bankaccount-accountNumber-input').click()
    cy.get('#bankaccount-accountNumber-input').type('123456789')
    cy.get('[data-test=bankaccount-submit] > .MuiButton-label').click()
    /* ==== End Cypress Studio ==== */
  })
})
Real World Example
Clone the Real World App (RWA) and refer to the cypress/tests/demo/cypress-studio.cy.ts file.
History
| Version | Changes |
|---|---|
| 8.1.0 | Added ability to generate assertions |
| 6.3.0 | Added Cypress Studio as experimental |